


By Tetiana Stoyko
- CTO & Co-Founder
Single-Page Application Tutorial [React Case]
Have you ever wondered what is SPA and how is it created? Here is a brief and simple tutorial for you.
There are various ways how to create your own website. One of the most common and popular sofrware product development services for website suggests the creation of single-page application, or SPA.
Therefore, we would like to present a brief single-page application tutorial, discussing what it is, how it works, and how to build a single-page application, using React.
Single-Page Application Explained
As the name says, this type of web application is based on a single-page model. To make it simple, SPA works on demand, adding the needed materials if needed. Unlike most other types of websites, SPA is capable of updating only specific elements, leaving other UI elements untouched.
In fact, SPA can be compared with a Lego constructor: it operates various elements, instead of a whole page at once. For instance, the Server-Side Rendering approach(SSR), which is considered the main competitor of the SPA today, renders the whole page on the server and only then sends it to the user.
On the other hand, SPA renders changed elements on the user side. Thus, it shows better performance results. In other words, this approach treats User Interface parts as reusable and interchangeable.
Pros of Single-Page Applications
Actually, when we talk about the single-page application, we cannot avoid some bonuses. For example, it is relatively easy to develop and comprehend. Additionally, it regularly shows much better user experience results, compared to rivals.
Actually, SPA has shown itself as a great out-of-box solution for the fast development of a wide-feature web application. Single-page applications, despite their drawbacks, are a great choice for a seamless user experience. Moreover, this technological architecture highly boosts the response time.
Finally, it is very customizable, especially, when we talk about the user interface. It supports multiple UI operating options and treats these elements as reusable, offering them as templates, which will be later used in numerous variations. No doubt, it simplifies the life of designers a lot.
Cons of Single-Page Apps
However, it is also impossible not to talk about drawbacks.
The most known and repeated is the issue, related to Search Engine Optimization. For instance, such an architectural approach makes it very difficult for search engines and their crawlers to gather all the needed data about the web application, analyze it, and index it properly.
While SSR is independent of the user, and all content from such websites is stored or cached, so crawlers can get all the needed data, SPA is rendered only on demand, i.e. when users visit it. Therefore, search engines like Google cannot gather all the info, unless the users are constantly present on the webpage.
Yet, it is not the only issue. Honestly, it is definitely not the best architecture for designers and marketers. Mostly, SPAs are incompatible with Content Management Systems. Hence, it results in additional barriers to these departments.
Moreover, it is impossible to make any significant changes to the application without coding. Consequently, marketers are obliged to constantly cooperate directly with the developers in order to make any shifts. Yet, this communication may be difficult due to the difference between the used terms.
For example, usually, people use the term “page”, while SPA provides an alternative - “routes”, still operating “page” in a different way. So, developers may misunderstand others.
How to Build a Single-Page Application?

Basic Information
To be more precise, let’s consider a specific case. First of all, we need to choose a tech stack. Frankly speaking, the variety of custom development tools for single-page application development is very wide.
For example, developers can use different open-source libraries and frameworks like Angular, Vue, Ember, etc. Nonetheless, React is probably the most common and popular solution for such purposes. For teams scaling a React SPA beyond the tutorial stage, our React.js development services provide the architecture and senior capacity to take it to production.
Therefore, we will create our SPA with the use of React as well. It is one of the best and simplest ways, which also allows finding developers for team extension services very fast.
In order to build a single-page application on React, we need to use the create-react-app {app name} command at the very beginning. Yet, it is not the only step. To use this command we need an npx utility:
npx create-react-app test_app
Now our project is created and we can start working on it. To access our project files we need to locate it by using the cd {folder name} command. If you want to start the project, you will have to use the npm start command. After it, we can also reach our application in a web browser. Usually, it is can be found by the http://localhost:3000/ link. This helps us to ensure that everything is working correctly for now.
If everything is ok, and we have successfully started a project, we can start coding. To start the development stage itself, we need to use a code editor tool. The variety is countless, but we propose you use Visual Studio Code. Also, before actual coding, we need to set some specific predefined structure of the project, that looks like this:
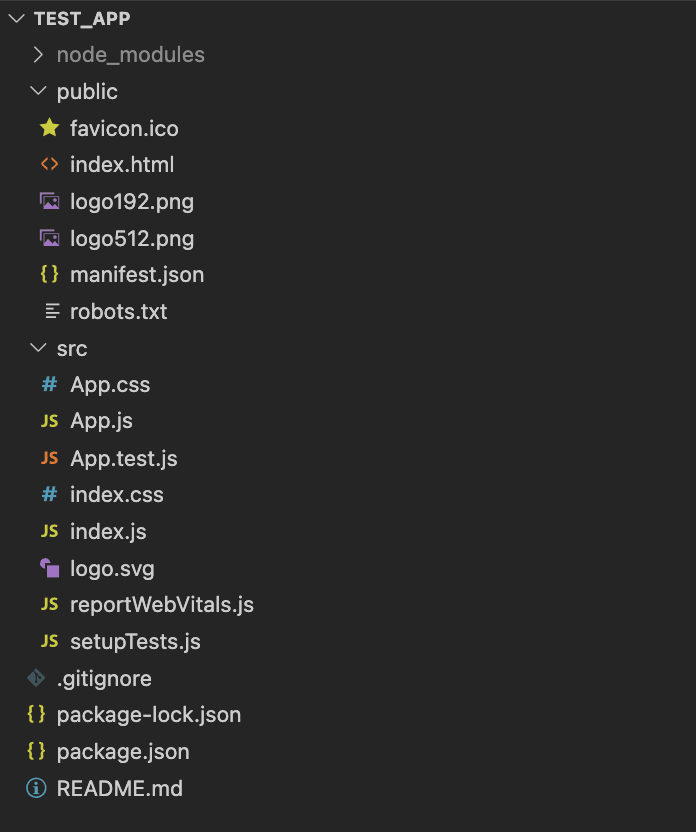 Click to expand
Here we can specify 3 main folders:
- node_modules is the place, where all the modules and dependencies are stored;
- public, a folder, where all webpage-related components are saved. Additionally, the index.html file, which works as a site template, is located;
- and src, a place, where we save all the main code units and components. Here we can save, rewrite, or add some new code blocks.
Additionally, we have a few extra files, that are not included in any of the foregoing folders:
- .gitignore, which helps to hide folders and files, while using the GIT control system;
- package.json, document, where all metadata of the project is kept: its name, initial versions of modules, scripts for starting/testing the product, etc.
- package-lock.json - for all needed and full data about all used dependencies, their versions, and other related info.
- README.md - simple and brief documentation about all used resources, app components, guides or instructions, etc.
Single-Page Application Source Code
The index.htm file is the entry point to the app and contains the main tags:
- <!DOCTYPE html> - it tells the browser, what HTML version is used in our project. In our case - it is the fifth version, yet it may vary.
- <html></html> - the main tag that wraps all other tags, and thus tells the browser whether it is an HTML document or not.
- <head></head> - saves the metadata to help search engines to understand the web app, and crawl needed data.
- <body></body> - contains all tags, shown on the webpage, which the user can interact with. It looks like this:
<!DOCTYPE html>
<html lang="en">
 <head>
   <meta charset="utf-8" />
   <link rel="icon" href="%PUBLIC_URL%/favicon.ico" />
   <meta name="viewport" content="width=device-width, initial-scale=1" />
   <meta name="theme-color" content="#000000" />
   <meta
     name="description"
     content="Web site created using create-react-app"
   />
   <link rel="apple-touch-icon" href="%PUBLIC_URL%/logo192.png" />
   <link rel="manifest" href="%PUBLIC_URL%/manifest.json" />
   <title>React App</title>
 </head>
 <body>
   <noscript>You need to enable JavaScript to run this app.</noscript>
   <div id="root"></div>
 </body>
</html>
<body></body> in Detail
This thesis includes two very important tags:
- <noscript>(message)</nosript>, which is used to show various messages to users if their browser does not support or somehow limits the capabilities of JS.
- <div id=”root”></div> - it is a container, where all HTML files from the src folder can be transferred to. It is important to note that access is provided via the link id=”root”.
React Part
The index.js file is the entry point at this stage:
const root = ReactDOM.createRoot(document.getElementById('root'));
root.render(
 <App />
);
Here, we can get our <div> element with the use of id=”root”. Then, with the help of the ReactDOM.createRoot() method, we can generate the root of our project, and assign a variable to it. This variable is displayed with the use of the render() method, which accepts the component - a container for other app components. But firstly, we need to import it:
import App from './App';
Additionally, we need to import React from the react library:
import React from 'react';
The same is true for ReactDOM from the react-dom library:
import ReactDOM from 'react-dom/client';
Both libraries were created automatically when you created your project. Actually, the <App/> component already contains some HTML attributes, which can be seen when we visit http://localhost:3000/
import logo from './logo.svg';
import './App.css';

function App() {
 return (
   <div className="App">
     <header className="App-header">
       <img src={logo} className="App-logo" alt="logo" />
       <p>
         Edit <code>src/App.js</code> and save to reload.
       </p>
       <a
         className="App-link"
         href="https://reactjs.org"
         target="_blank"
         rel="noopener noreferrer"
       >
         Learn React
       </a>
     </header>
   </div>
 );
}

export default App;
Therefore, let’s delete all unnecessary attributes and instead add a few components we need. Yet, it is better to leave the App component, so it remained as a container. Here are some simple examples of Homepage and “About” page for comparison and better illustration:
Homepage:
function HomePage() {
 return (
   <div>
     Homepage
   </div>
 );
}

function AboutPage() {
 return (
   <div>
     About page
   </div>
 );
}
“About” page:
function App() {
 return (
   <>
     <HomePage/>
     <AboutPage/>
   </>
 )
}
We need to make these components separate. For this purpose we will use a react-router dom package:
npm install react-router-dom
As a result, all necessary dependencies will be installed automatically. Among the installed, we need:
BrowserRouter - which is used for saving browser history, Route - responsible for showing components, related to the URL, Switch - for rendering the first Route, which matches the address, Link - for navigating our product.
import {
 BrowserRouter,
 Route,
 Routes,
 Link,
} from "react-router-dom";
Let's wrap everything in a BrowserRoute component, which will contain our wrapper part for the Route - Switch. The Route component contains the “path” property that has an assigned URL, which must be unique, and have an “element” property, that contains our page component:
function App() {
 return (
   <BrowserRouter>
     <Routes>
       <Route path="/" element={<HomePage />}/>
       <Route path="/about" element={<AboutPage />}/>
     </Routes>
   </BrowserRouter>
 );
}
For more convenience, let’s add navigation, using the Link component:
<header>
<nav>
 <ul>
   <li>
     <Link to="/">Homepage</Link>
   </li>
   <li>
     <Link to="/about">About page</Link>
   </li>
 </ul>
</nav>
</header>
Also, it is a great idea to add Route, which will display a message to the user, if the page address is incorrect:
function NotFoundPage() {
 return (
   <div>
     Page not found
   </div>
 );
}

       <Route path="/*" element={<NotFoundPage />}/>
Here the path variable takes the string “/*”. This means that if no page is found for a URL, another page will be displayed to which we can add a message that “no page was found” for that URL. The final code unit for our single-page application will look like this:
import React from "react";

import {
 BrowserRouter,
 Route,
 Routes,
 Link,
} from "react-router-dom";

function HomePage() {
 return (
   <div>
     Homepage
   </div>
 );
}

function AboutPage() {
 return (
   <div>
     About page
   </div>
 );
}

function NotFoundPage() {
 return (
   <div>
     Page not found
   </div>
 );
}

function App() {
 return (
   <BrowserRouter>
     <header>
       <nav>
         <ul>
           <li>
             <Link to="/">Home page</Link>
           </li>
           <li>
             <Link to="/about">About page</Link>
           </li>
         </ul>
       </nav>
     </header>

     <Routes>
       <Route path="/" element={<HomePage />}/>
       <Route path="/about" element={<AboutPage />}/>
       <Route path="/*" element={<NotFoundPage />}/>
     </Routes>
   </BrowserRouter>
 );
}

export default App;
Summary
Here is an easy single-page application tutorial on how to build an SPA. Clearly, the final result is oversimplified and too far from the title of a full-fledged web application.
Nevertheless, all the foregoing is enough to create a basis for your future project, which can be modified with countless features and components, depending on your requirements and skills of dedicated team for hire.
If your SPA also needs a mobile companion, you can hire React Native developers to share business logic between the web app and mobile, keeping feature parity with less duplication.
We also helped you to better understand the single-page application phenomenon. If you are willing to get some more examples of how your final product can look like and what services it can provide - don’t hesitate to research and analyze case studies.
Remember: the more you learn - the easier it will be to develop.
FAQ


YOU MAY ALSO LIKE


Get in Touch
Got no clue where to start? Why don’t we discuss your idea?

Just pick a time. No forms.


This site uses cookies to improve your user experience. Read our Privacy Policy
Accept