Video On Demand Processing with AWS: The Best Way
February 04, 2022 • 1562 Views • 12 min read
Tetiana Stoyko
CTO & Co-Founder
The demand for video is growing, and even more businesses find infinite possibilities in this sector. We’re not just referring to entertainment or instructional materials here. Content providers, small businesses, and corporate brands are all benefiting from video on demand. Brands can build stronger relationships with their customers by offering them the access to the information they want, whenever and however they want it. Thus, such visualization became the most convenient way to share data with software users.
VOD (video on demand) refers to any content delivery method that allows users to select when, where, and how they interact with media integration. This can be accomplished by either simultaneous broadcasting from an internet source or by the user downloading the video to personal device for subsequent viewing. This is in contrast to traditional streaming, when the viewer may only see their film on a gadget with a satellite or cable connection at a certain period.
VOD Streaming has a wide range of applications in the business sector. It may be used to make money, connect with people, and more. Although creating video content necessitates a substantial amount of time and work, many experts believe that the investment is worthwhile. VOD streaming data and trends show how valuable this API integration is, for example the statistics demonstrates, that the websites featuring video content keep visitors on the site for longer period of time. This factor influences the engagement of the user with the content, and in particular with the VOD streaming – increasing the chances to convert a lead into a client.
Why VOD Delivery on AWS?
By using AWS Cloud, Amazon Web Services (AWS) offers two media integration solutions for delivering VOD content to worldwide viewers. The Video on Demand on Amazon Web Services solutions provide the resources needed for API integration of sustainable, decentralized VOD transportation and management processes.
This solution makes use of Amazon Web Services, which decompose the workflow into individual phases, making it easy to adapt or expand the architecture to meet your unique video on demand requirements.
This method reaches multiple functional advantages:
- Transcode videos uploaded to S3 into formats that can be played on a variety of devices automatically.
- Upload individual files for each inputs to customize MediaConvert job settings.
- Store transcoded files in a destination bucket and send to end users through Amazon CloudFront.
The AWS solution for Video on Demand may be readily modified and used as a starting point for more sophisticated workflows. The VOD on AWS solution, on the other hand, makes use of AWS Step Functions, which break down the workflow into individual phases, making it easy to adapt or expand the architecture to meet your unique video-on-demand requirements.
Read also: Why AWS is a great choice for deployment? [Installation Insights]
Getting Started
This guide will show you how to set up and configure different API integration services to upload, transcode, and deliver video on demand to your users.
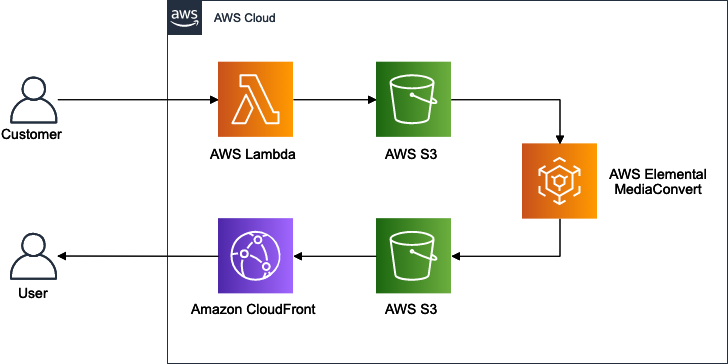
First of all, we need to plan the content storage and processing pipeline. It would be a great solution to implement video uploading on serverless architecture. The choice was made by the peculiarity of video content transferring. It could easily cause traffic overhead on any server, and balancing systems in most cases are too slow to react to them quickly enough. It is the reason we use AWS Lambda to accept media integration, store it on an S3 bucket, and trigger processing with AWS Elemental MediaConvert service.
Here is the diagram of the system we going to build:
Requirements
- Amazon Web Services account
- Python 3.8
- Git 2.0 or newer
1. Create user and storage for videos
Create AWS User
First, we need to create an AWS user and buckets for files. To create the user you should follow the following instructions:
- Sign in to the Amazon Web Services Management Console and open the IAM console.
- Select Users from the navigation pane, then Add Users.
- Select the Programmatic access as a type of access
- For permissions choose S3, MediaConvert, Lambda, Cloudfront, IAM, CloudWatch Events, and CloudFormation

- For tags, you could add whatever you want to categorize the user by.
Copy Access key ID and Secret access key. We’ll need them later for Lambda to access resources.
Create S3 buckets
The workflow we planned to implement needs 2 buckets: one to store videos downloaded by customers, and the other one to store transcoded videos and contribute them to users. So you have to follow the instruction below twice.
- Go to Amazon Web Services S3 dashboard.
- Press Create bucket button and type the bucket’s name.
- Then choose the default region for your account and don’t forget to check the “Block all public access” checkbox to be chosen, otherwise, there would be security issues in the system.
Left other options as is and press Create bucket button
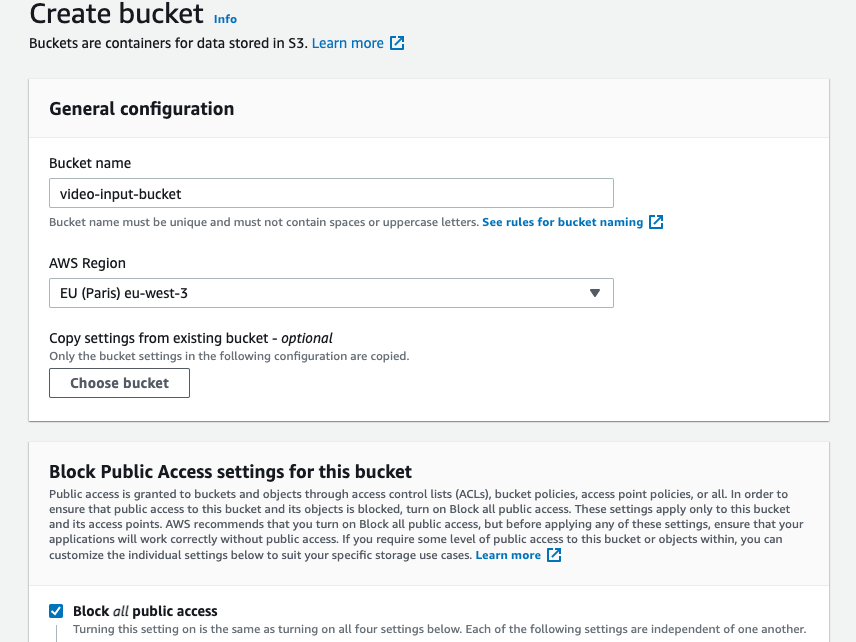
Buckets should be created in the same account with the same region.
2. Create CloudFront distribution for videos
We need the distribution to provide videos to users all over the world. To create one, please, follow the instructions:
- Visit AWS CloudFront home page and press the button Create a CloudFront distribution.
- As origin choose output S3 bucket created in previous step.
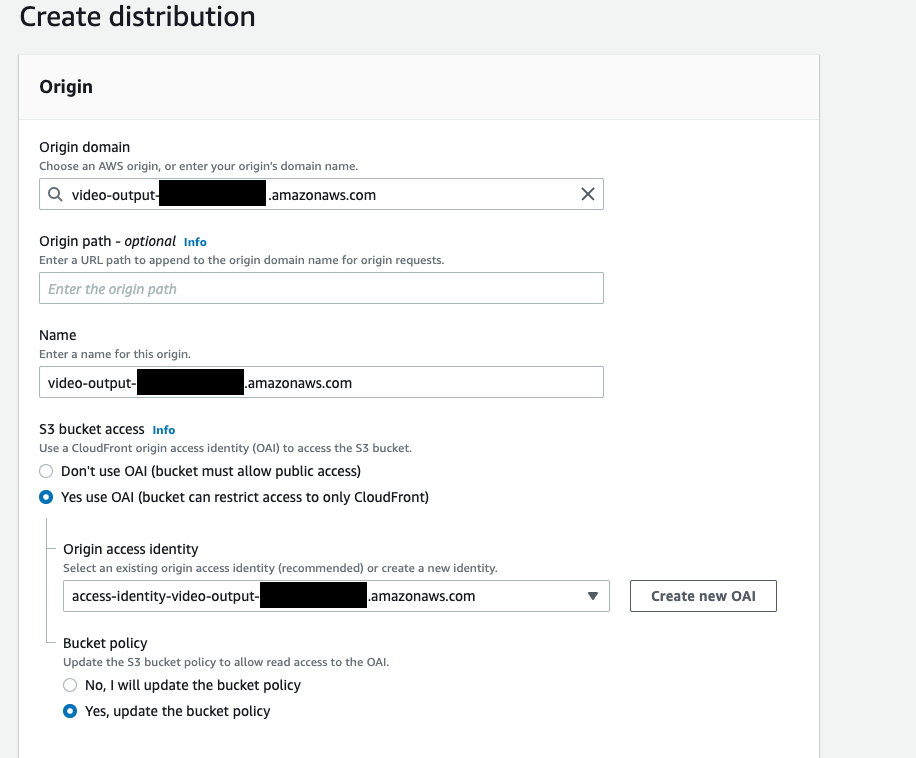
- For bucket, access choose to use OAI and then Create a new OAI for the distribution. Also, don’t forget to hit the update bucket policy button.
- Then leave other options default till you came to the Viewer section when you should choose Redirect HTTP to HTTPS option.
- Below the menu, you could set up an alternate CNAME and choose a certificate for your domain. This allows you to provide your URL to end-users.
- Then click the Create distribution button and store the distribution’s id.
3. Create Lambda function
Then we need to create and deploy an API with 1 endpoint to upload videos. In the future, we could extend the functionality of the system to allow managing uploaded videos. We suggest using the Flask application with the Zappa package to set up and deploy the app on AWS Lambda. Flask is a lightweight and easy-to-use Python framework that fits our goals extremely well.
As one option you could clone (by command git clone) the sample app here.
In the next step, you need to configure the app to work with your infrastructure. In the configs folder, there is an app_config.json file which should be populated with AWS IAM user’s credentials, input/output buckets, and CloudFront distribution id you’ve created early in this guide.
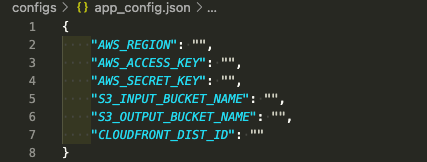
Then you should install modules for Python. You could do this by following the instructions below:
- Create a virtual environment by the command: python3 -m venv venv
- Activate the env: source venv/bin/activate
- Install packages pip install -r requirements.txt
- Add IAM user’s credentials to the file ~/.aws/credentials under video_uploader tag. It should look like this:

Our next step is to set up Zappa to deploy the code on Amazon Web Services lambda.
- Type the command: Zappa init
- Choose environment name and video_uploader profile
- Then choose any bucket you want to upload code (it could be the default) and leave the modular path as is
- Press y to confirm settings
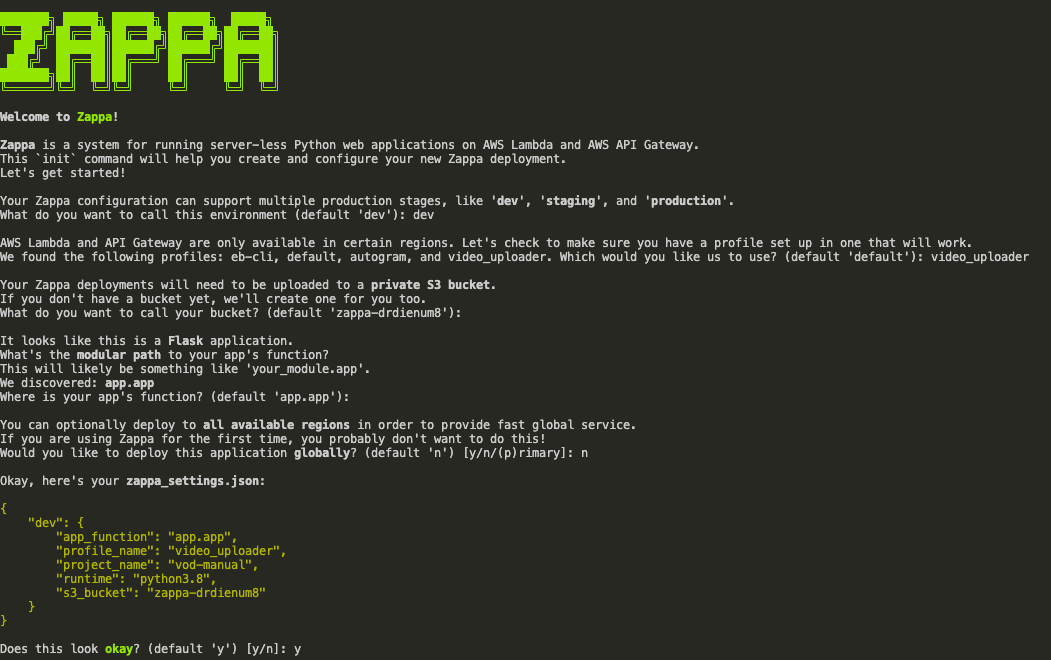
After the setup, you could type Zappa deploy dev to deploy the code to lambda. When the command is finished you get an URL to upload your videos to. You could test the functionality by executing this sample cURL:
curl --location --request POST '{your_api_url}/upload_video' \
--form 'video=@"{full_path_to_video}"'
Replace your_api_url with the URL you got after Zappa deploy and full_path_to_video with a path to the video you want to upload.
Summary
VOD streaming is extremely useful in a variety of sectors and for a variety of purposes. Viewers may enjoy accessible media anytime and wherever they choose using VOD. Users gets great material while also getting the convenience they want via VOD streaming.
The nice thing about streaming and video on demand is that they’re not mutually exclusive: you can benefit the most from combining the two. You may use live broadcasts to connect with viewers and establish relationships, and VOD to reuse previously recorded content. All of this while lowering expenses and increasing service. By including live stream sessions in your video on demand library, viewers will have access to your content 24/7. They may watch available material whenever and wherever they choose thanks to video on demand. Your target audience gets memorable online experiences as well as the convenience and performance that they expect.
Here we described how to set up and deploy infrastructure to upload, process and deliver VOD streaming to users all around the world. The system is resistant to loads and simple to use. There are a lot of ways to improve such kind of API integration. But first and foremost, we want to make an ephasize on authorization functionality and the video managing panel. If you strive to apply media integration into your software, fill in the contact form and enhance your idea with valuable VOD experience.
What’s your impression after reading this?
Love it!
1
Valuable
1
Exciting
1
Unsatisfied
2
FAQ
Let us address your doubts and clarify key points from the article for better understanding.
TEST
TEST
TEST2
TEST2
you may also like
Let’s talk!
This site uses cookies to improve your user experience. Read our Privacy Policy
Accept
Share this article