AWS Cognito and Alexa Skill Account Linking: Voice Technology Guide
February 04, 2022 • 1444 Views • 13 min read
Tetiana Stoyko
CTO & Co-Founder
Learning about voice technology for the integration of such an innovation is at its peak. As we have already discovered in the previous part of this guide – voice technology could completely amend your software idea, and insert the benefits it brings. But if you are still wondering if that is something your app will need, don’t hesitate to read Part 1 on Incora’s Voice technology Guide.
Since in the first part we’ve highlighted the process of the initial installation of Alexa skill and the development of the custom Voice technology, here we are going to focus on the next stage needed – Account linking. These operations are required for user recognition, so your voice assistant would identify the person who is entering the system. So, account linking should help in building a user’s background for more personalized interactions and offer customized solutions. Simply said, by means of account linking, your voice technology collects all the data about users, and applies those information to reduce bothering questions for profile identification. This will be done automatically. However, let’s get down to this concept in depth.
What is Account Linking regarding Alexa Skill?
Certain personalized skills necessitate the option of adding the user’s identity to the other’s system user. The purpose is to establish a relationship between the Alexa user and your system’s user account. Account linking allows you to securely authenticate users with services using your skill. Once the skill and external user account have been connected, the skill can perform tasks from the user with that account.
Account linking is conducted with the integration of OAuth 2.0. OAuth 2.0 is an open protocol that enables online, mobile, and desktop programs to request user authorization from remote services in a standard-compliant way. You may create your own OAuth server and identity management solution from scratch. But, to achieve the same result, you can utilize AWS Cognito that will assist you in developing a custom identity recognition. AWS Cognito uses User Pools, which are scalable user registry that can handle millions of members. User Pools is a fully managed service that is simple to set up without the need to worry about setting up server infrastructure, and it uses technical standards such as OAuth 2.0 to interrelate with your backend. Thus, below we will describe the process of Account Linking setup with the help of AWS Cognito, since it will result in a custom-made service. But first, let’s discover the advantages.
Advantages of Account Linking
Account linking is a preferable method for those who want to develop a user-friendly solution, convenient for the target. But in detail, what are those benefits, that could convince you to establish Account linking for your Alexa skill?
- Users can omit the creation of new profiles for each platform separately, which decreases configuration time and increase users engagement.
- Account linking allows registered users to keep employing their old account while using a new social or passwordless access.
- It is convenient for users who enrolled without a password to join their profile to one with more details.
- Apparently, your application could integrate the user recognition, which will gather data from the other sources and fill in the missed gaps on your system’s profile.
- It allows your software applications to access profile page details kept across several sessions.
Considering the advantages listed above, now you might question how to generate Account linking for your voice technology application, and adjust it to your needs. To learn more about that practical part of the process, follow further instructions.
Getting started
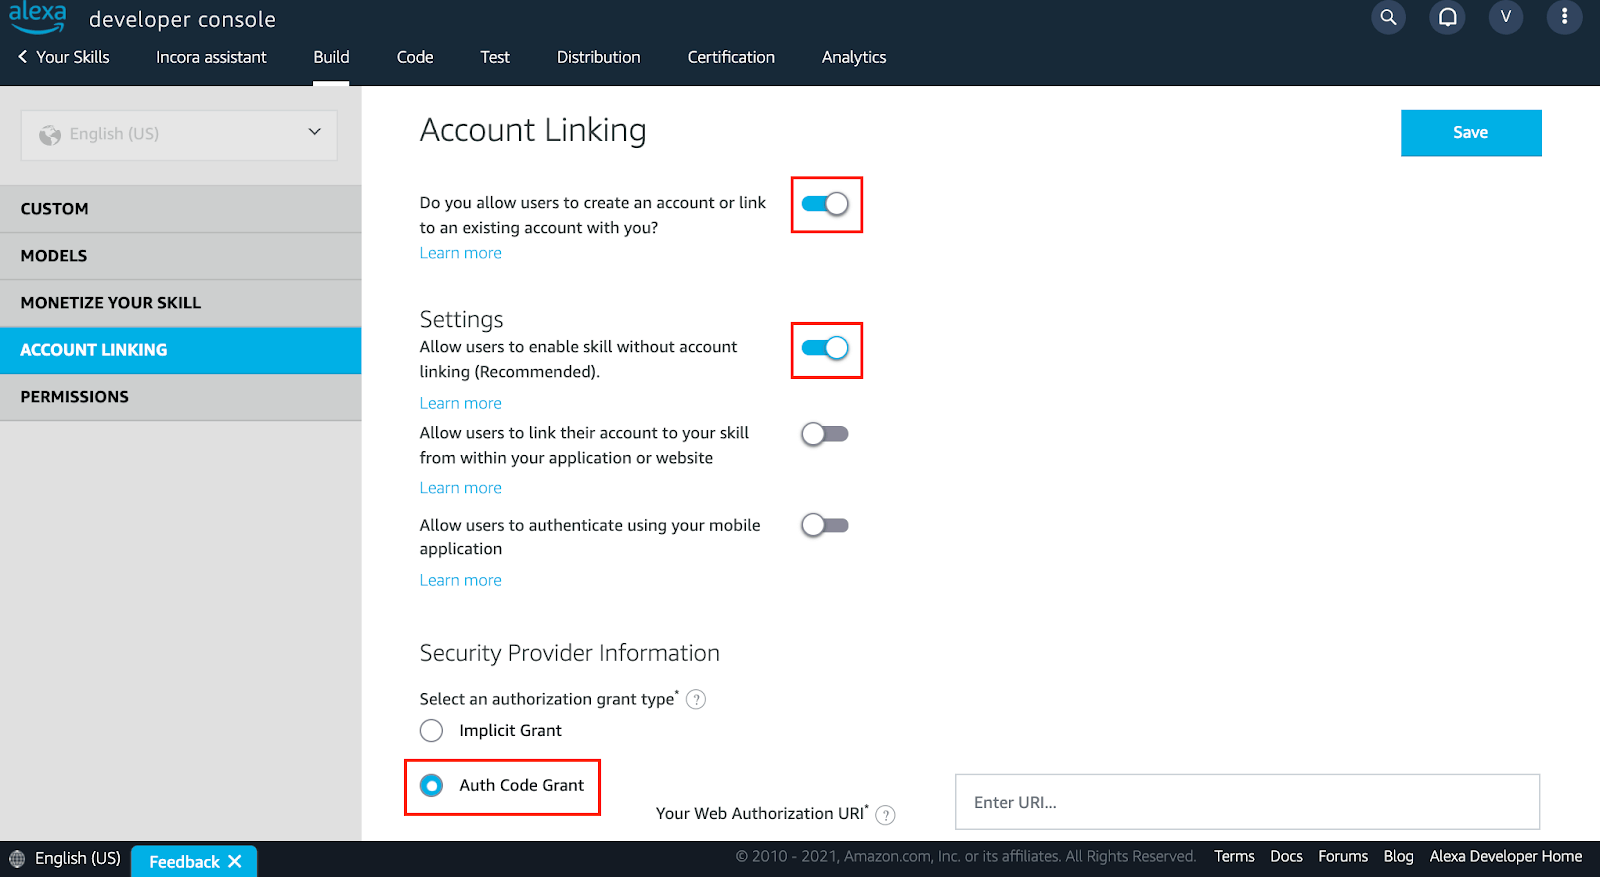
First of all, you need to go into Alexa Developer Console select your skill, click Tools and then Account Linking in your left sidebar.
The first phase is to configure the users’ access and action within account settings. We recommend, to allow users to create an account or link to an existing account with you and enabling skill without account linking. Under the block Securite Provider Information you should select Auth Code Grant as an authorization grant type. Exactly this type is used so that the user could obtain access tokens from the authorization code.
User Pool’s Setup
For the next step, you need to have an existing AWS Cognito User Pool or create a new one and set it up. To do so, move onto the AWS Cognito page. There we will set up User Pools in order to get the client id and secret id, which will be needed for the further configuration on the Alexa Developer Console.
Step 1: Sign in options
At the first step of User Pool’s Configuration, you should choose the way how the users will be able to sign in. Between the options Username, Email, and Phone Number, we choose Email and go on to Step 2.
Step 2: Security
Here you need to decide on the ways how to make the user experience with account linking more securable. For that purpose, you need to choose the password requirements and authentification method. For illustrative purposes, there is no need to write a custom policy, so we select the defaulted parameters. The same is with multi-factor authentication, there is no need for us to choose MFA, so we preferred the No MFA option. However, when developing your own solution, you can decide which measurements to set, and define customized requirements.
At this stage, you also need to configure the possible solutions for the users, when they forget their passwords. We definitely recommend enabling self-service account recovery, since it would be a common issue for each platform. And as a delivery method for the account recovery, we choose Email.
Step 3-4: Sign-up options and Message delivery
These steps are completely optional, and won’t affect the Account linking. Hence, we omit the instructions on them. You can also skip them as we did, or set up complying with your needs.
Step 5: App integration
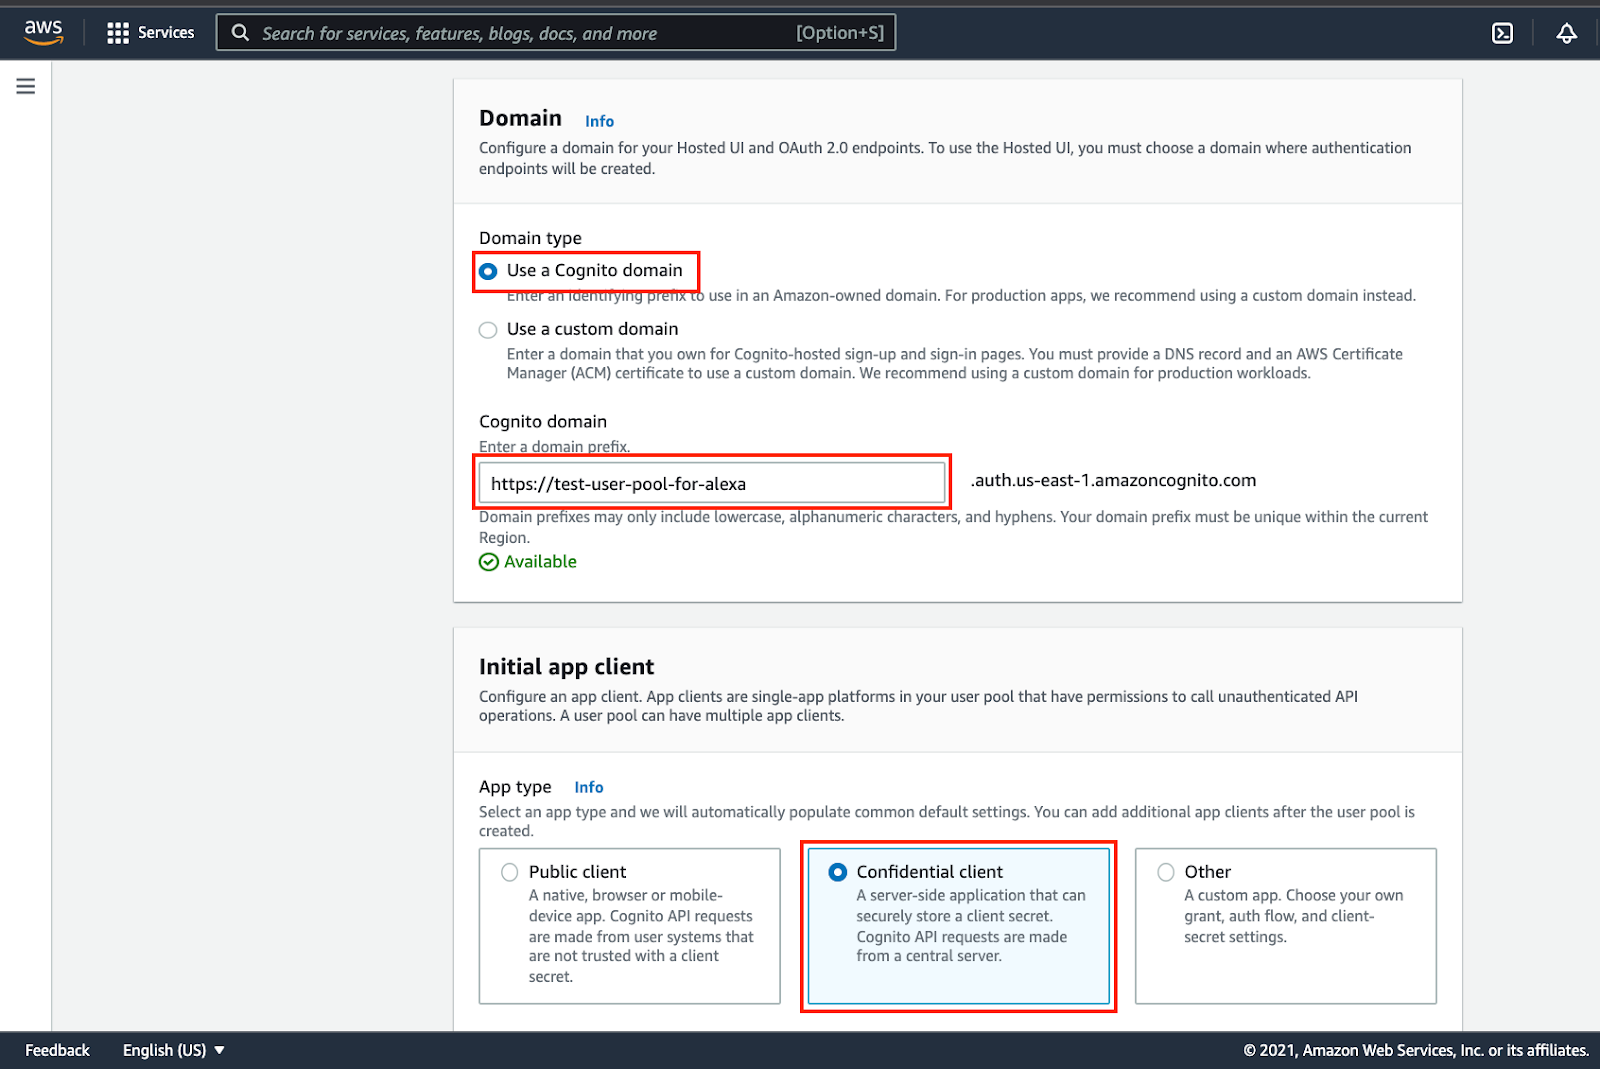
Let’s create the User Pool Name. As this is the example, we selected ‘Test User Pool’. Then we enable to use the AWS Cognito Hosted UI, since here is the part important for the following process we highlight in this article, namely AWS Cognito and Alexa Skill Account linking.
Then we configure a domain for the endpoints. Below we provided the screenshots to demonstrate this phase of the setup.
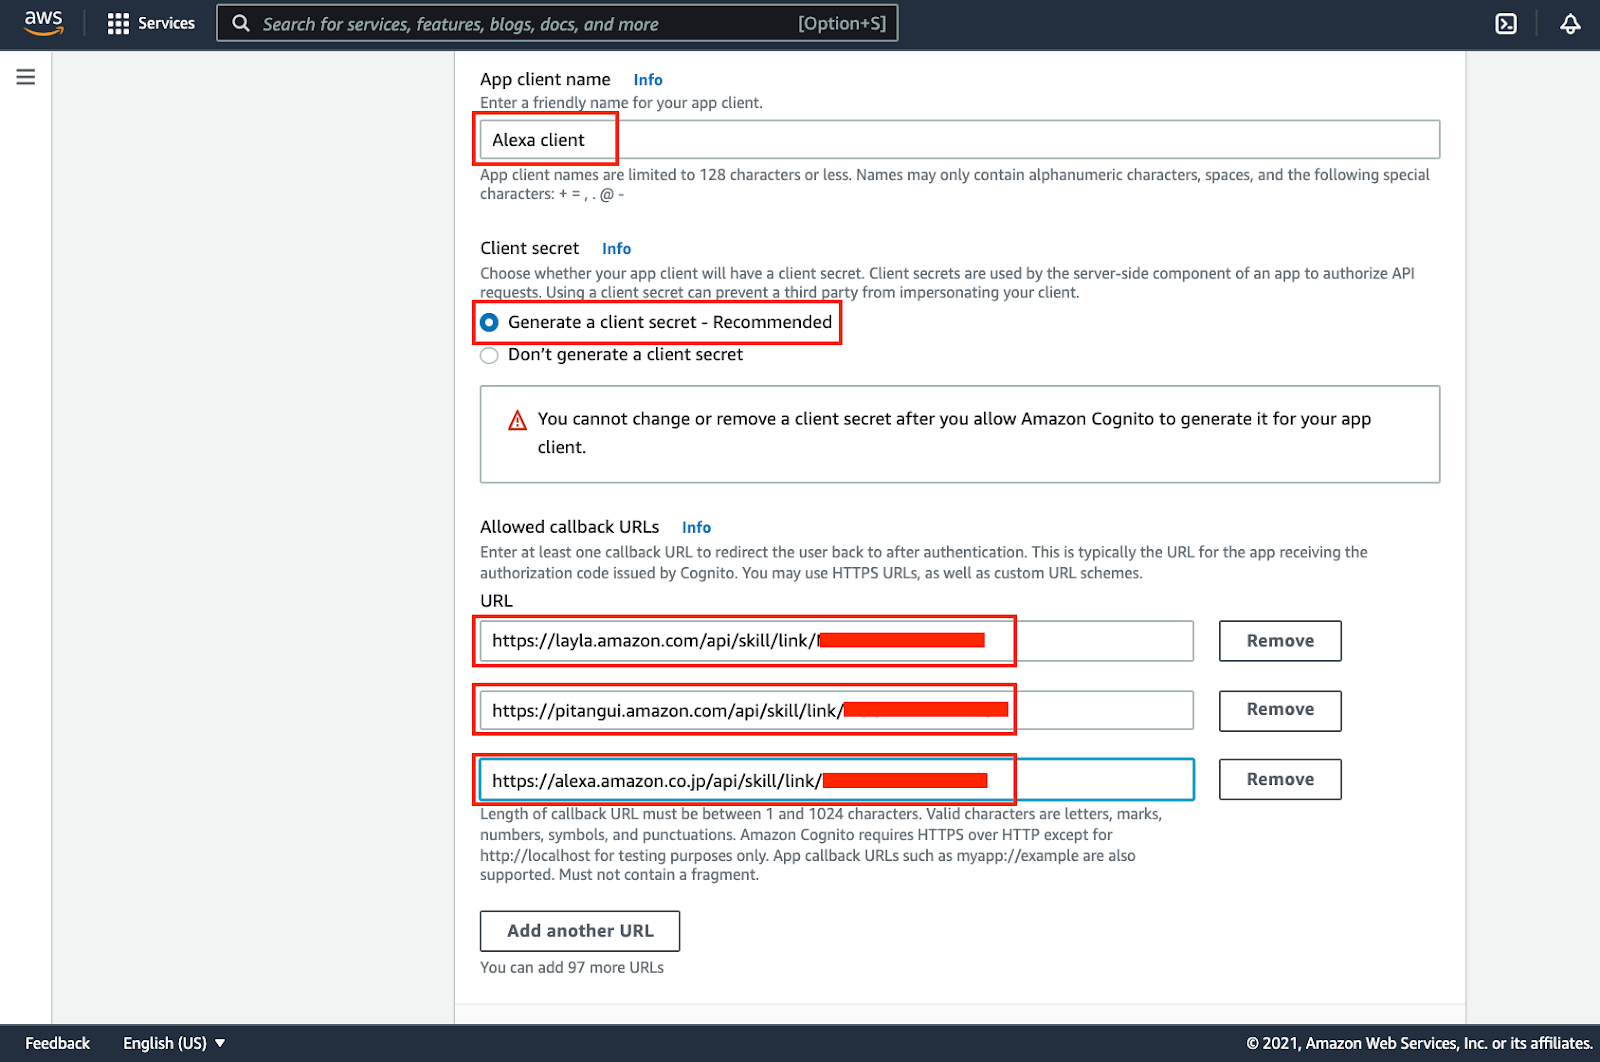
Now you need to copy callback URLs from Alexa Developer Console and insert them into the provided fields.
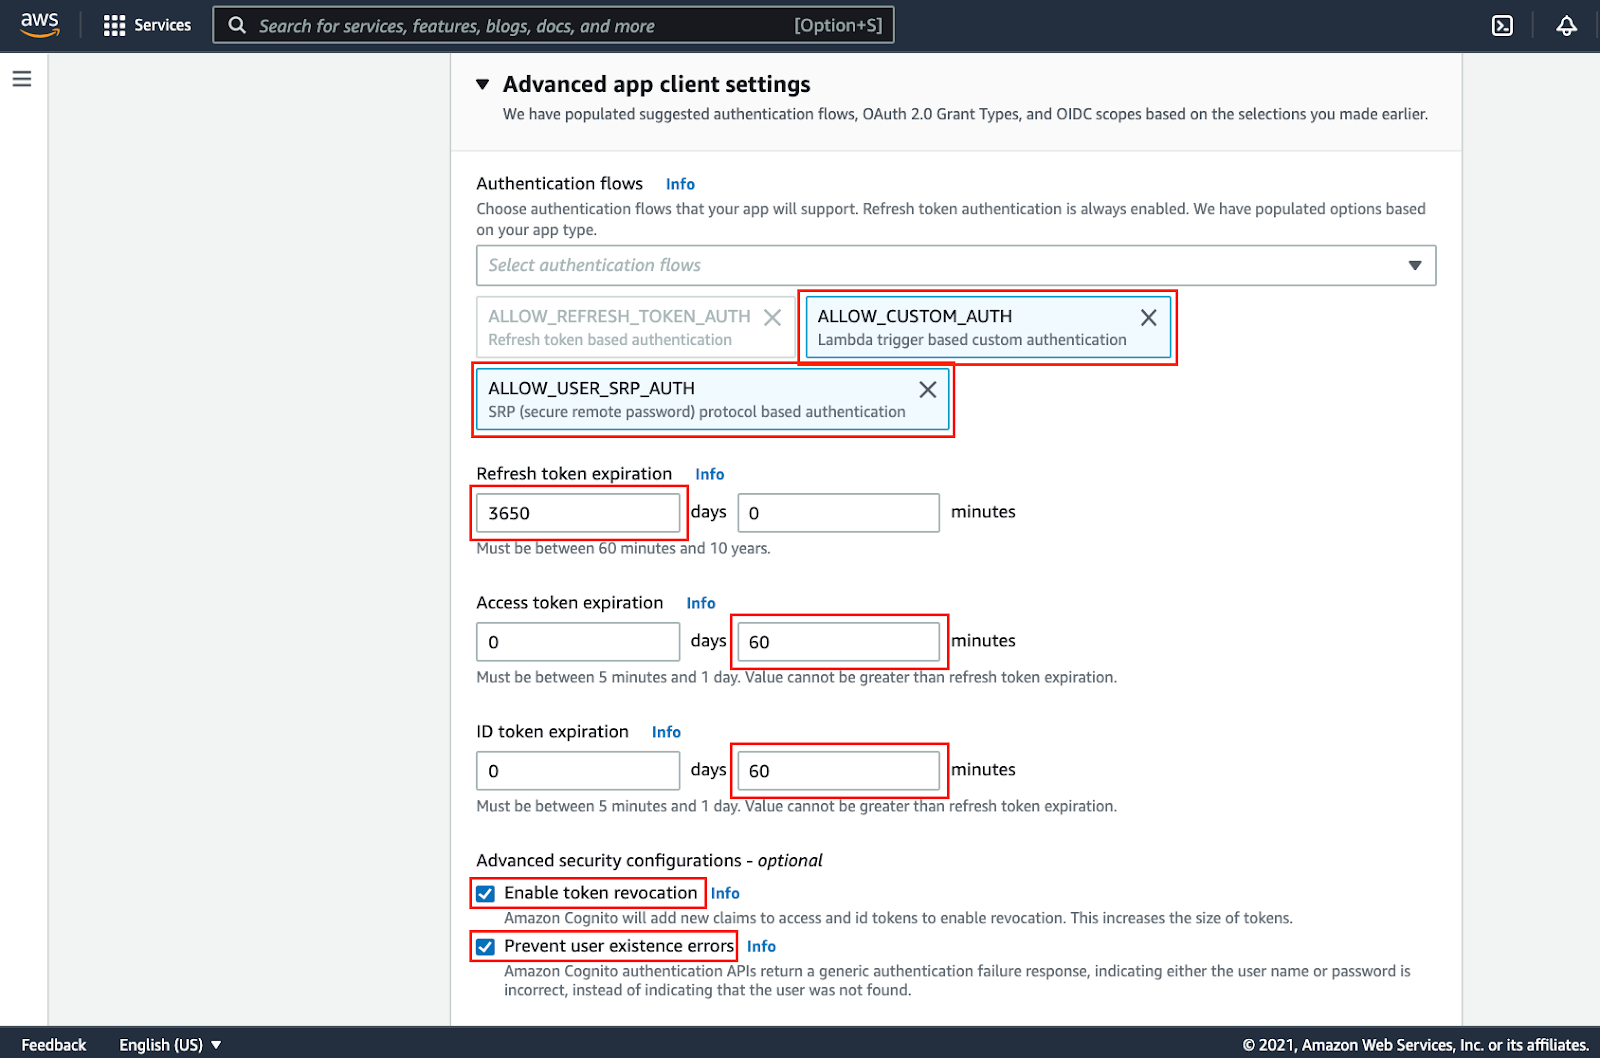
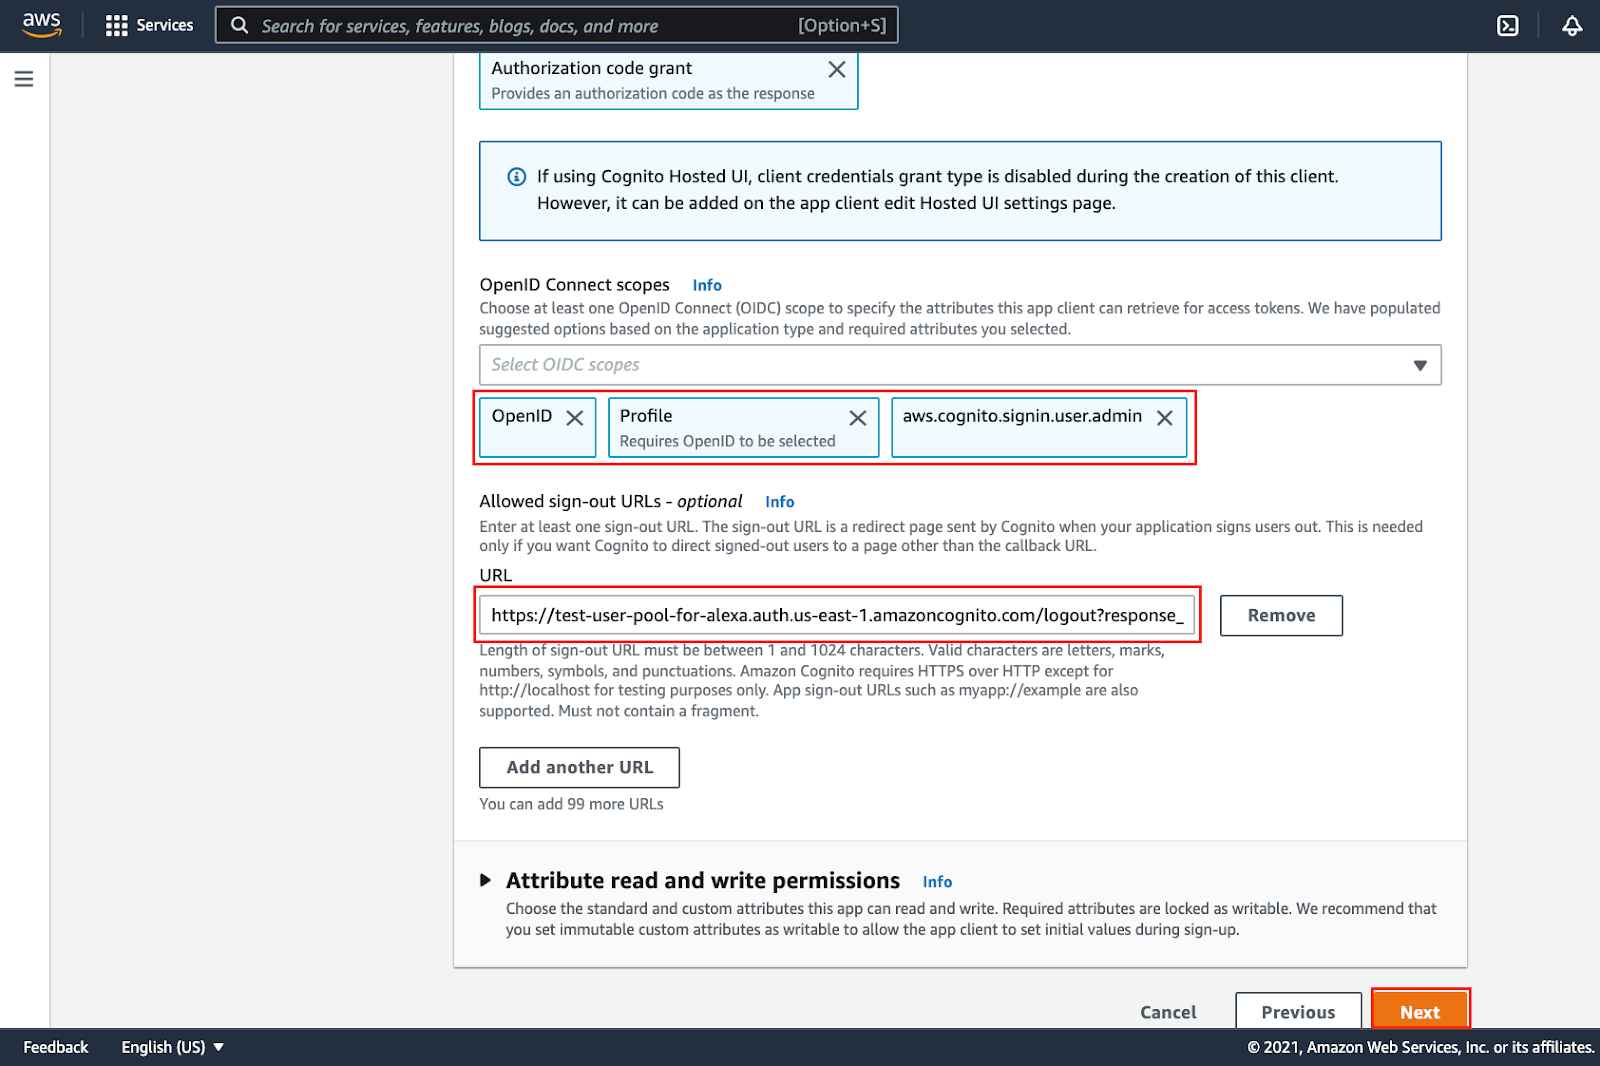
After all of the passed steps, you should set the sign-out URL. Since on the screenshot below, there is not the full version, here is the template we outlined for you:
https://{YOUR_DOMAIN}.auth.us-east-1.amazoncognito.com/logout?response_type=code
Step 6: Configurations approvement
Now you just need to submit all the changes you made and move on to the next stage of the Account linking process.
Auth Code Grant Layout
All the steps above lead to the formation of the client id and secret id. So, you copy that data from the tab ‘Test User Pool → App client: Alexa client’.
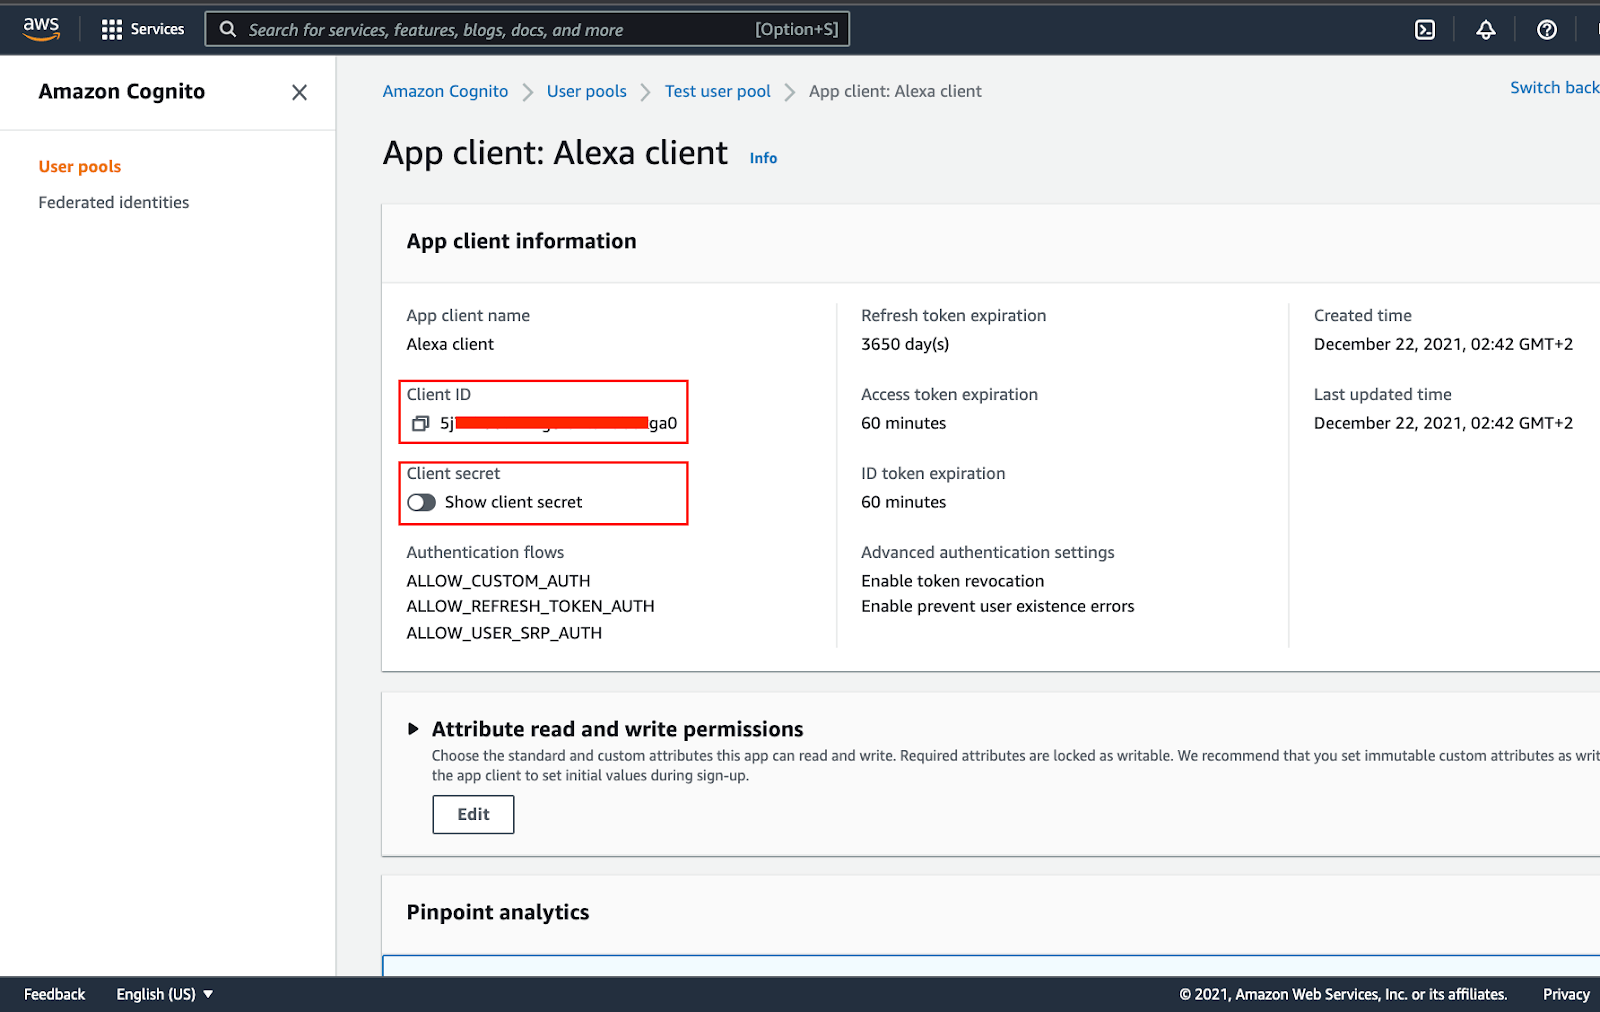
Then, you should return to Alexa Developer Console and finish the initial configurations.
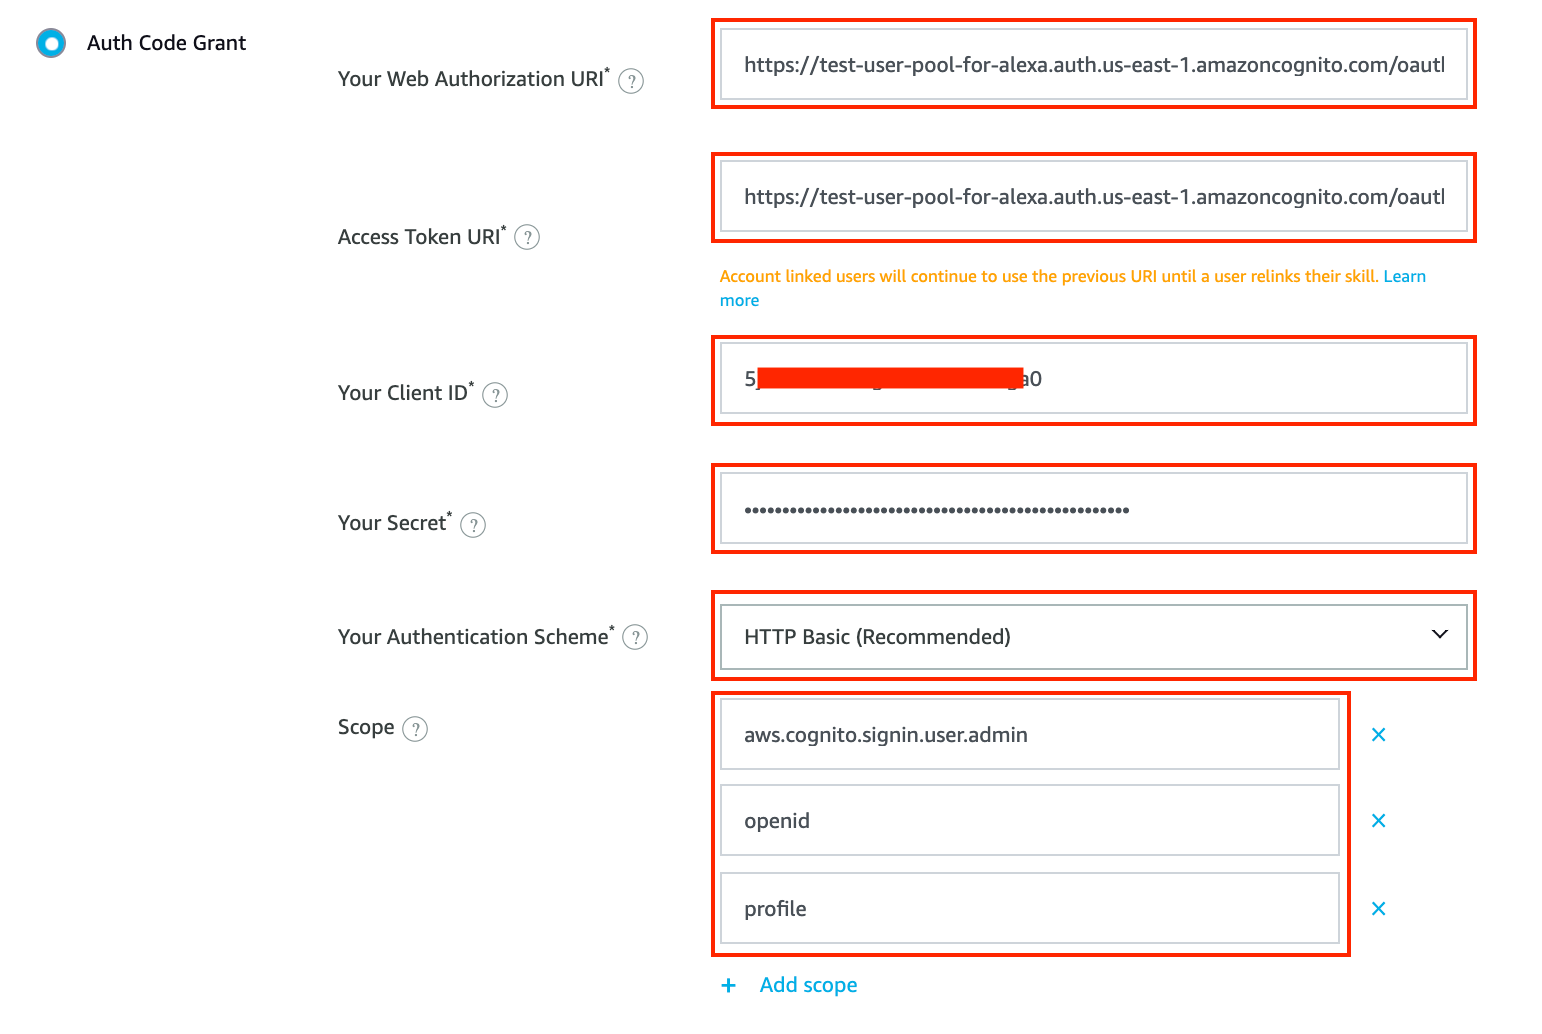
Here are the templates of the full URIs:
- Web Authorization URI:
https://{YOUR_DOMAIN}.auth.us-east-2.amazoncognito.com/oauth2/authorize?response_type=code&redirect_uri= https://pitangui.amazon.com/api/skill/link/{CODE}
- Access Token URI:
https://{YOUR_DOMAIN}.auth.us-east-2.amazoncognito.com/oauth2/token
For the last step, you need to create and connect AccountLinkingHandler in your Lambda function.
src/handlers/AccountLinkingHandler.js
const AccountLinkingHandler = {
 canHandle(handlerInput) {
   return !(
     handlerInput.requestEnvelope.session.user &&
     handlerInput.requestEnvelope.session.user.accessToken
   );
 },
 handle(handlerInput) {
   return handlerInput.responseBuilder
     .speak('Please link your account to the Incora assitance skill using the card that I have sent to the Alexa app. ')
     .withLinkAccountCard()
     .getResponse();
 },
};

module.exports = AccountLinkingHandler;
Finally, you can use userAccessToken for getting any information from your system for personalization. An example of how to obtain accessToken can be found below.
const TechnologyStackIntentHandler = {
 canHandle (handlerInput) {
   return handlerInput.requestEnvelope.request.type === 'IntentRequest'
     && handlerInput.requestEnvelope.request.intent.name === 'HelloWorldIntent'
 },
 handle (handlerInput) {
   // add your own logic
   // const userAccessToken = handlerInput.requestEnvelope.session.user.accessToken
   // now you can use userAccessToken for getting any information from your system for personalization
   // get data from some API, database, etc.
   return handlerInput.responseBuilder.
     speak('Our technology stack comprises JavaScript (Node, Angular, React, Ember, Vue), Python (Django), Mobile apps (React Native, Ionic).').
     reprompt( 'What\'s your request? ').
     getResponse()
 }
}

module.exports = TechnologyStackIntentHandler
That’s it, the account linking is already successfully adjusted and ready to be used! Now, your voice assistant is much closer to user satisfaction.
Summing up
Hopefully, this guide gave you a good grasp of Voice technology implementation and related processes like Account linking with Alexa skill. We tried to explain in plain language the internal tech operations, which are required for the easy-functioning user experience. But if you are ready to let specialists show their expertise in all these configurations – we are happy to help. Leave your message and fill in the contact details below, so we could immediately reach out to you!
What’s your impression after reading this?
Love it!
1
Valuable
1
Exciting
1
Unsatisfied
1
FAQ
Let us address your doubts and clarify key points from the article for better understanding.
you may also like
Let’s talk!
This site uses cookies to improve your user experience. Read our Privacy Policy
Accept
Share this article