
AWS Cognito over JSON Web Token: Revealing Integration Practices
February 04, 2022 • 1371 Views • 16 min read


Tetiana Stoyko
CTO & Co-Founder
In the case of apps that need server-side implementation, the clients (mobile app or web browser) must typically confirm their identity to the server. For example, a person using Chrome to access Facebook after previously logging in transmits certain data to the FB server establishing the identity.
There are multiple ways to implement custom user authentication to the software. But there are two most convenient methods to make it happen: through Amazon Web Services Cognito and JSON Web Token.
Using AWS Cognito for user authentication on the application side is likely to be a faster option than building the entire user authentication service from scratch. Furthermore, you won’t have to worry about the backend because AWS Cognito will handle everything for you. In addition, various error messages, service connections, and UI forms will be given out of the box. If you wish to utilize sophisticated security features like phone number verification, two-factor user authentication, or log in with Google/Facebook, this is an excellent option.
On the other hand, there are JSON Web Token – movable units of identification. JSON Web Tokens are becoming increasingly common. Customer identification and access management (CIAM) companies all over the world are touting JSON Web Tokens as the panacea to all ills. JWTs are nice, but let’s talk about some of their drawbacks and alternate options you could explore.
AWS Cognito overview
AWS Cognito is one of several services offered by Amazon’s cloud platform. You may simply link this service to other Amazon Web Services such as API integration, AppSync, and Lambdas by using this service. It can save user data such as given name, family name, email, login, password, and any other information that your users typically save in the online or mobile application.
AWS Cognito provides user authentication, authorization, and user management for your web and mobile apps. Your users can sign in directly with a user name and password, or through a third party such as Facebook, Amazon, Google, or Apple. With AWS Cognito we can quickly and easily create user authentication, authorization with the minimum of code that will be secure, scalable, and configurable.
Benefits
- The AWS SDK handles everything for you, so you won’t make many mistakes during the login process.
- IAM provides fine-grained access management to AWS resources.
- Authentication does not require an additional lambda function in front of each API.
- You may save custom characteristics for users such as an address, phone number, city, and any other custom field that you desire.
- The AWS Amplify module has already encrypted and protected the data delivered by the application.
Drawbacks
- AWS SDK must be used explicitly on the client-side.
- Programmers must include it into their toolchains and use it throughout development. It adds a layer of complication.
- The documentation is infrequently updated and is sparsely detailed.
- There are restrictions on the number of custom field characteristics that can be used. There can be no more than 25 custom characteristics.
JSON Web Token overview
JSON Web Token includes identification information in the form of JSON and may be provided to services and apps. A JSON Web Token may be verified by any service or application. The service/application that receives a JSON Web Token is not required to check with the identity provider that created the JWT to see if it is legitimate. Once a JSON Web Token has been confirmed, the service or application can utilize the data contained inside it to take action on the user’s behalf.
Benefits
- When indicating fewer DB queries, there is no Database Table.
- If your design does not require client Sessions and your security fundamentals are clear, developing with JWT is quicker than utilizing current frameworks.
- All subsequent requests will not need to be routed via the authorization server since only the Auth-server will have access to the private key.
Drawbacks
- Only one Secret Key was compromised by JWTs.
- The client cannot be managed from the server.
- JSON Web Token is entirely reliant on the Signing algorithm. Crypto also can be deprecated.
- The more information you provide in the JSON Web Token, the longer it becomes linearly.
- To validate the contents and obtain the user-id from the token, JSON Web Token employs cryptographic Signature techniques. It necessitates knowledge of cryptography, which complicates JWTs’ understanding.
The best way in action
Analyzing all the advantages and disadvantages of both approaches, AWS Cognito might be a good option if you’re creating a new prototype application. It will allow you to swiftly focus on value-generating application features while providing you with the security of a secure authentication system. We can connect SES (Simple email service) to AWS Cognito to send auth emails for account confirmation, reset the password, email with a temporary password (when the user was created by admin), emails messages could be customized through the Cognito UI or Lambda triggers.
Considering that we had an experience working with AWS Cognito, we’re pleased to reveal the integration process for you. Let’s start with the meaning and explanation of what are the User Pools.
What are the User Pools?
A user pool is a user directory in AWS Cognito. With a user pool, your users can sign in to your web or mobile app through AWS Cognito, or federate through a third-party identity provider (IdP)
User pools provide:
- Sign-up and sign-in services.
- A built-in, customizable web UI for user sign-in.
- Social sign-in with Facebook, Google, Login with Amazon, and Sign in with Apple, and through SAML and OIDC identity providers from your user pool.
- User directory management and user profiles.
- Security features such as multi-factor user authentication (MFA), checks for compromised credentials, account takeover protection, and phone and email verification.
- Customized workflows and user migration through AWS Lambda triggers.
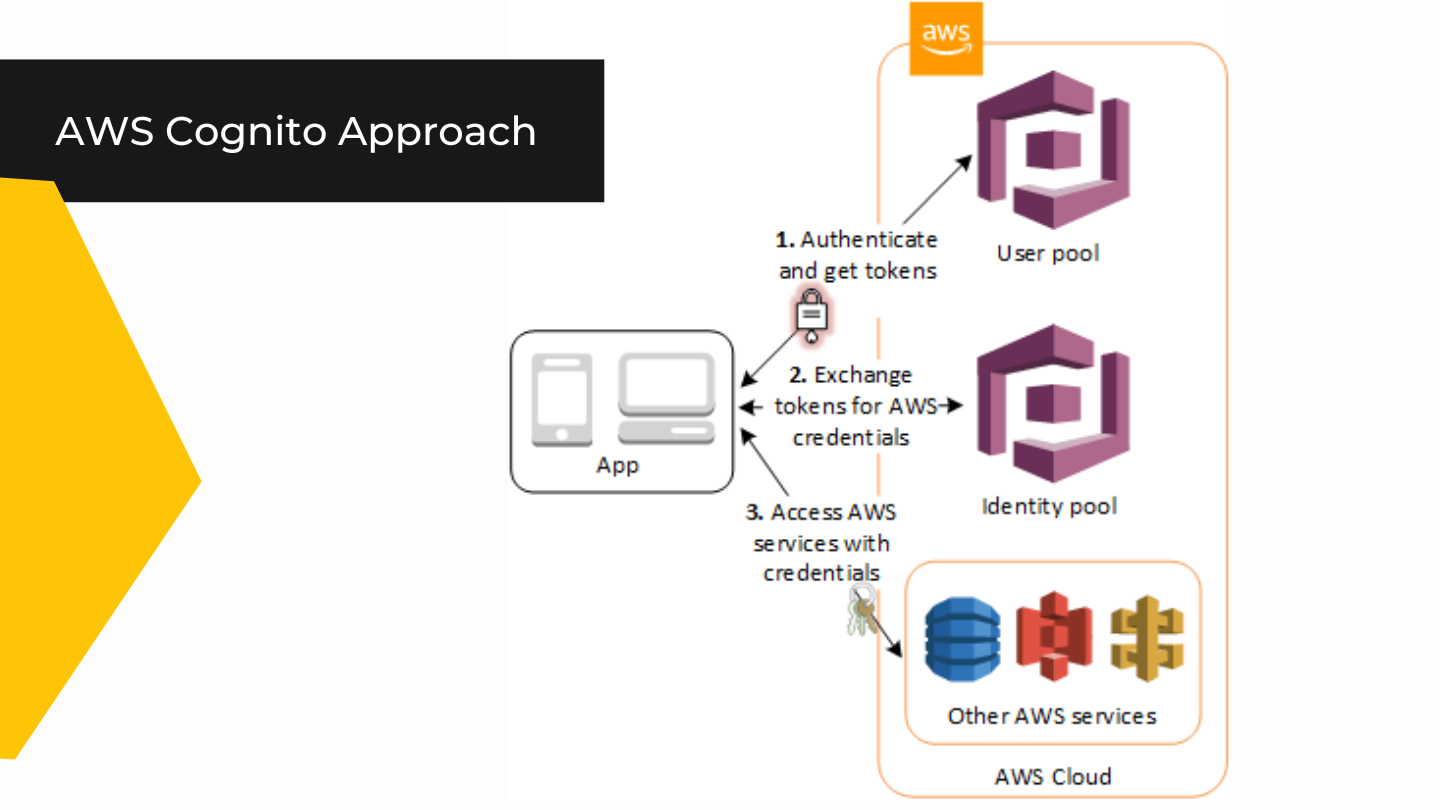
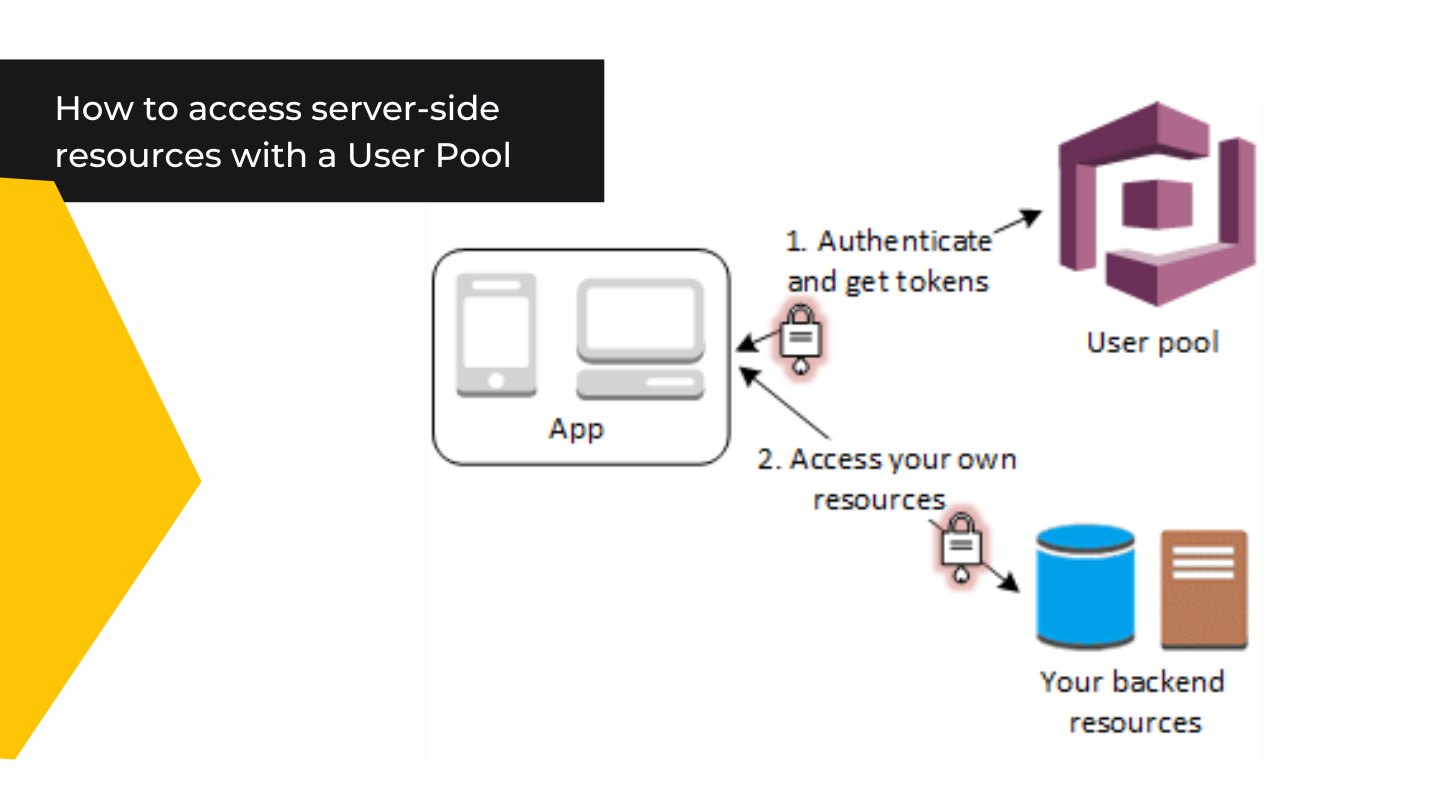
One of the most common use cases is to access your server-side resources with a User Pool.
Getting started
First of all, we need to create and config the User Pool.
Go to Cognito in the Amazon Web Services console and click Manage User Pools. Then create a user pool. Insert the name of your user pool and click ‘Step through settings’ to configure all needed parameters.
Sign in parameters
The next step is to config parameters for user sign-in. Here AWS Cognito is very flexible and allows us to config it depending on our business needs. We can use a username, email, or phone number to sign in user. In this case, we will use only email plus password sign-in. Also, we add required attributes predefined by AWS Cognito or create new ones that are specific to our needs.
Password setup
The next section is password configuration. For the major security, we recommend having at least one number, one upper case letter, one lower case letter, and one special character with a minimum length of 8 symbols. Also, when the user is created by the admin, temporarily send it to the user email and we can change the expiration time of the password from 1 day to 90 days.
Multi-Factor user authentication, recovery password, and attribute verification. In this guide, we will not use MFA, but AWS Cognito allows us to configure it with different options. We are using only email for user authentication so we want to recover passwords only through it, and the same for verification.

Email configurations
In this section, we can configure what and how messages will be sent for password recovery and account confirmation. Let’s take a look at how the email message will be sent. By default, AWS Cognito won’t use SES but it can be changed. Before choosing SES as an email sender, you need to config SES but it is out of the scope of this guide. So we will use the default AWS Cognito email sender that is ok for development and testing, but we need to remember that has a limit of 50 emails per day.
The next will be the same page where we can configure how an email message will look like. We can customize it using HTML code. Also, we can do more advantage customization using Lambda triggers where we will have access to different user data like username, email, phone number or other attributes there saved for the user.
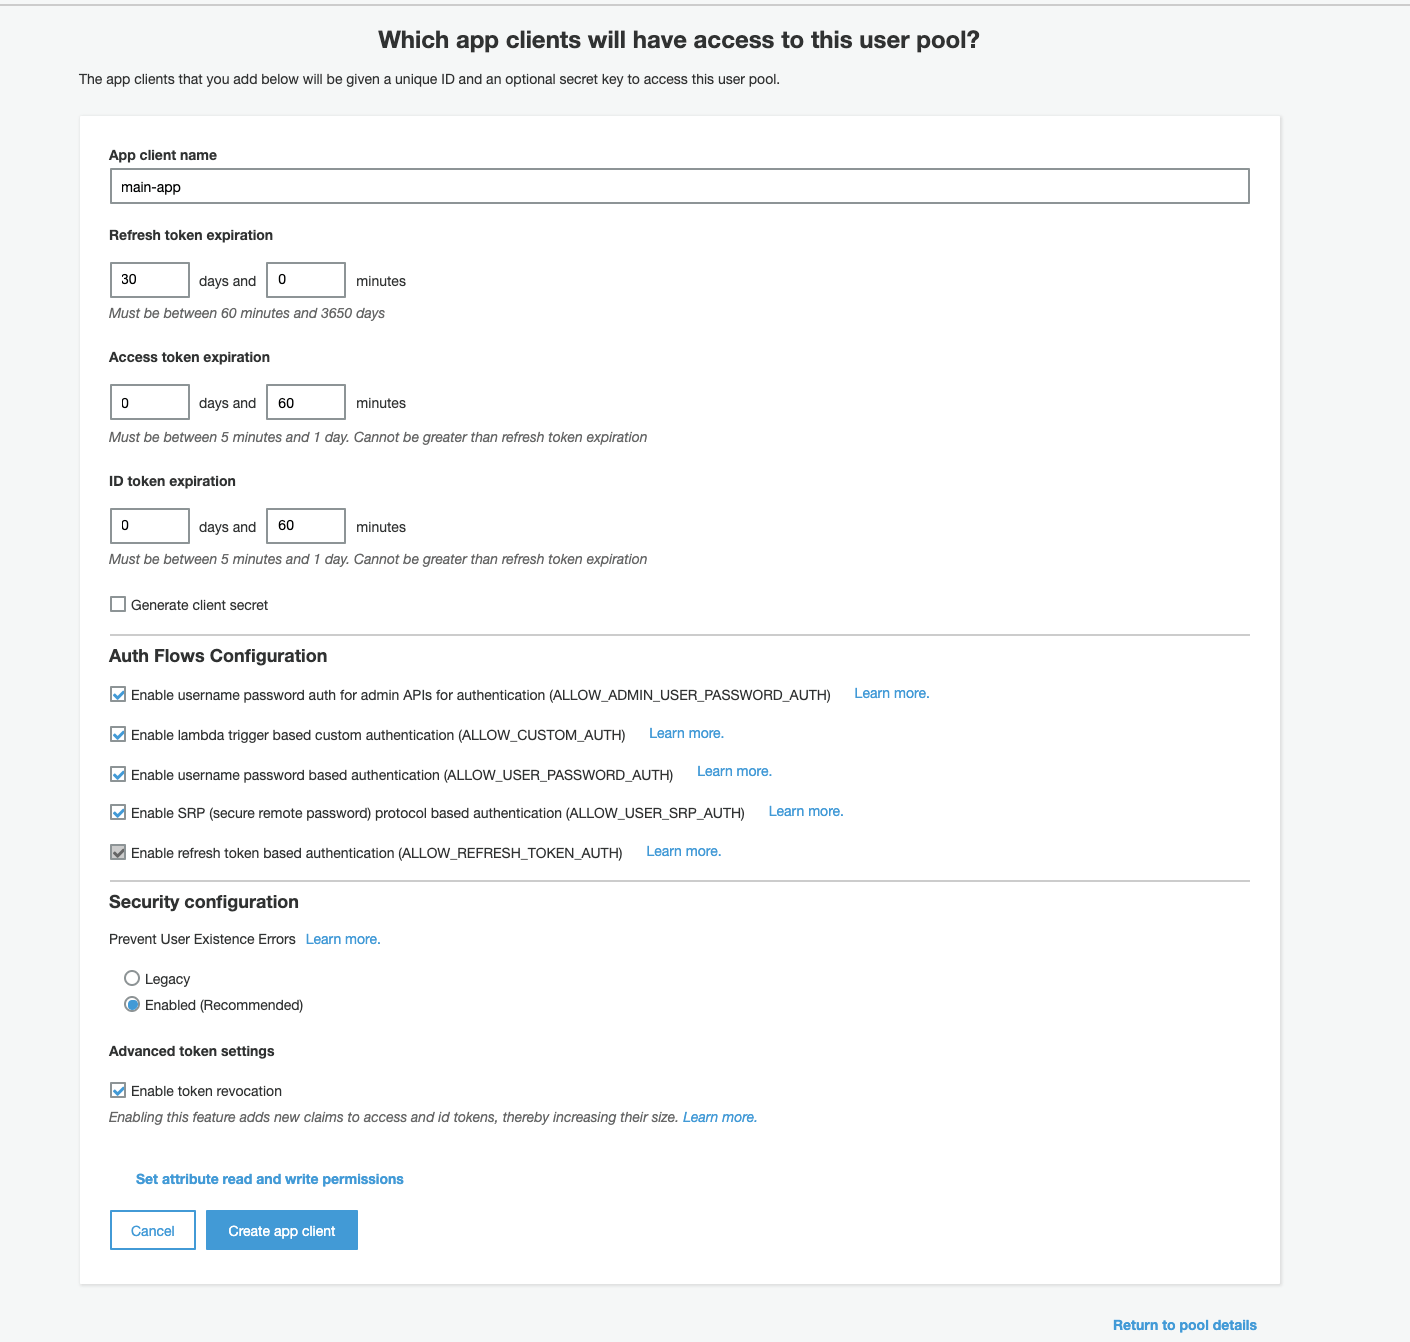
Client creation
The next step is Client creation. Clicking the button ‘Add an app client’, we will see this page. Choose the name of the app. In the token configuration section, we can choose how long tokens will be valid. It depends on business logic and security requirements. If you don’t have specific requirements for this, we recommend choosing the standard time for token expiration as in the screenshot below.
Then we need to create an app client and generate a client secret id which we can use later.
Lambda triggers
The last step is Lambda triggers, which allow us to perform many things, but particularly:
- Process and save user data on the backend after registration or authentification
- Customize email messages
- Create custom auth flow
- Migration of users from your existing user management system into your Cognito user pool
- Config token creation
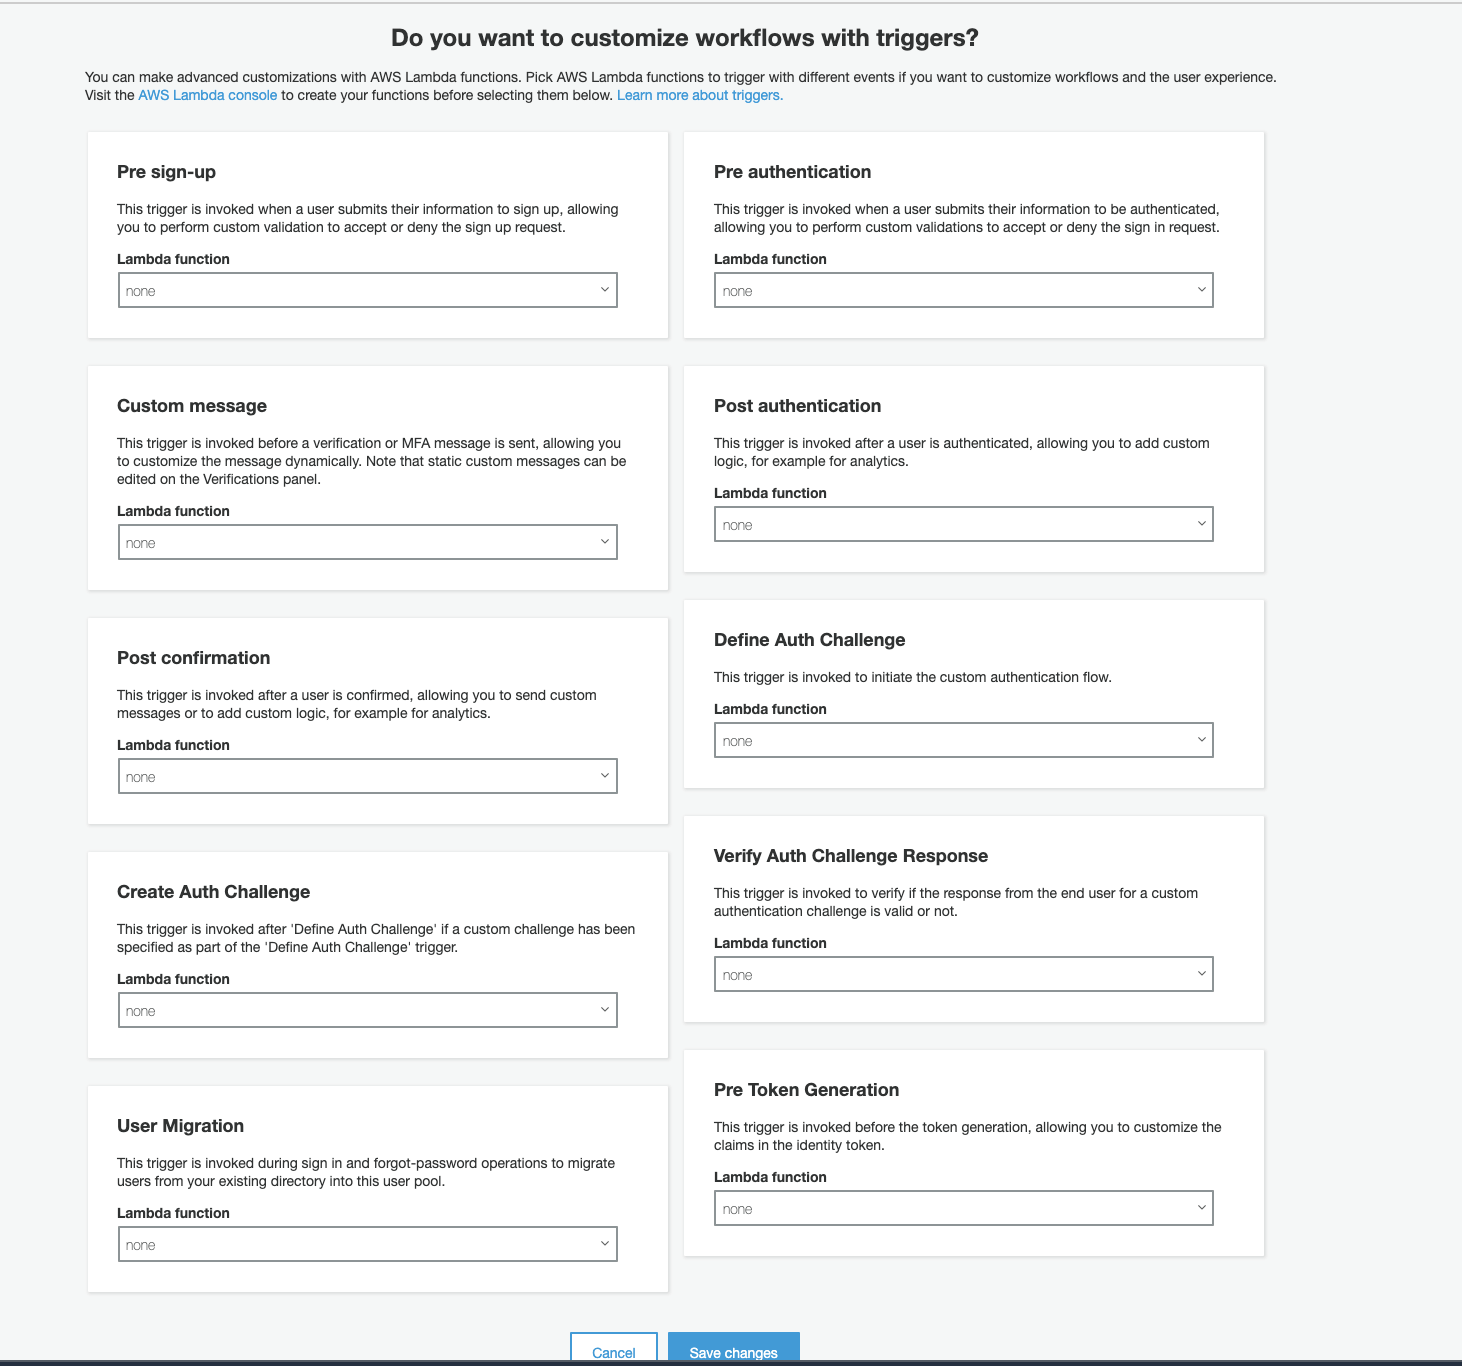
For now, we will not create Lambda functions to set them as a trigger, so we’ll leave it as it is.
That’s all. We have finished the configuration of our AWS Cognito user and we can click the ‘create’ button.
When we created our User pool we need to save two important ids because we will be using them in our code later. The first one is Pool ID which can be found in the General settings section.
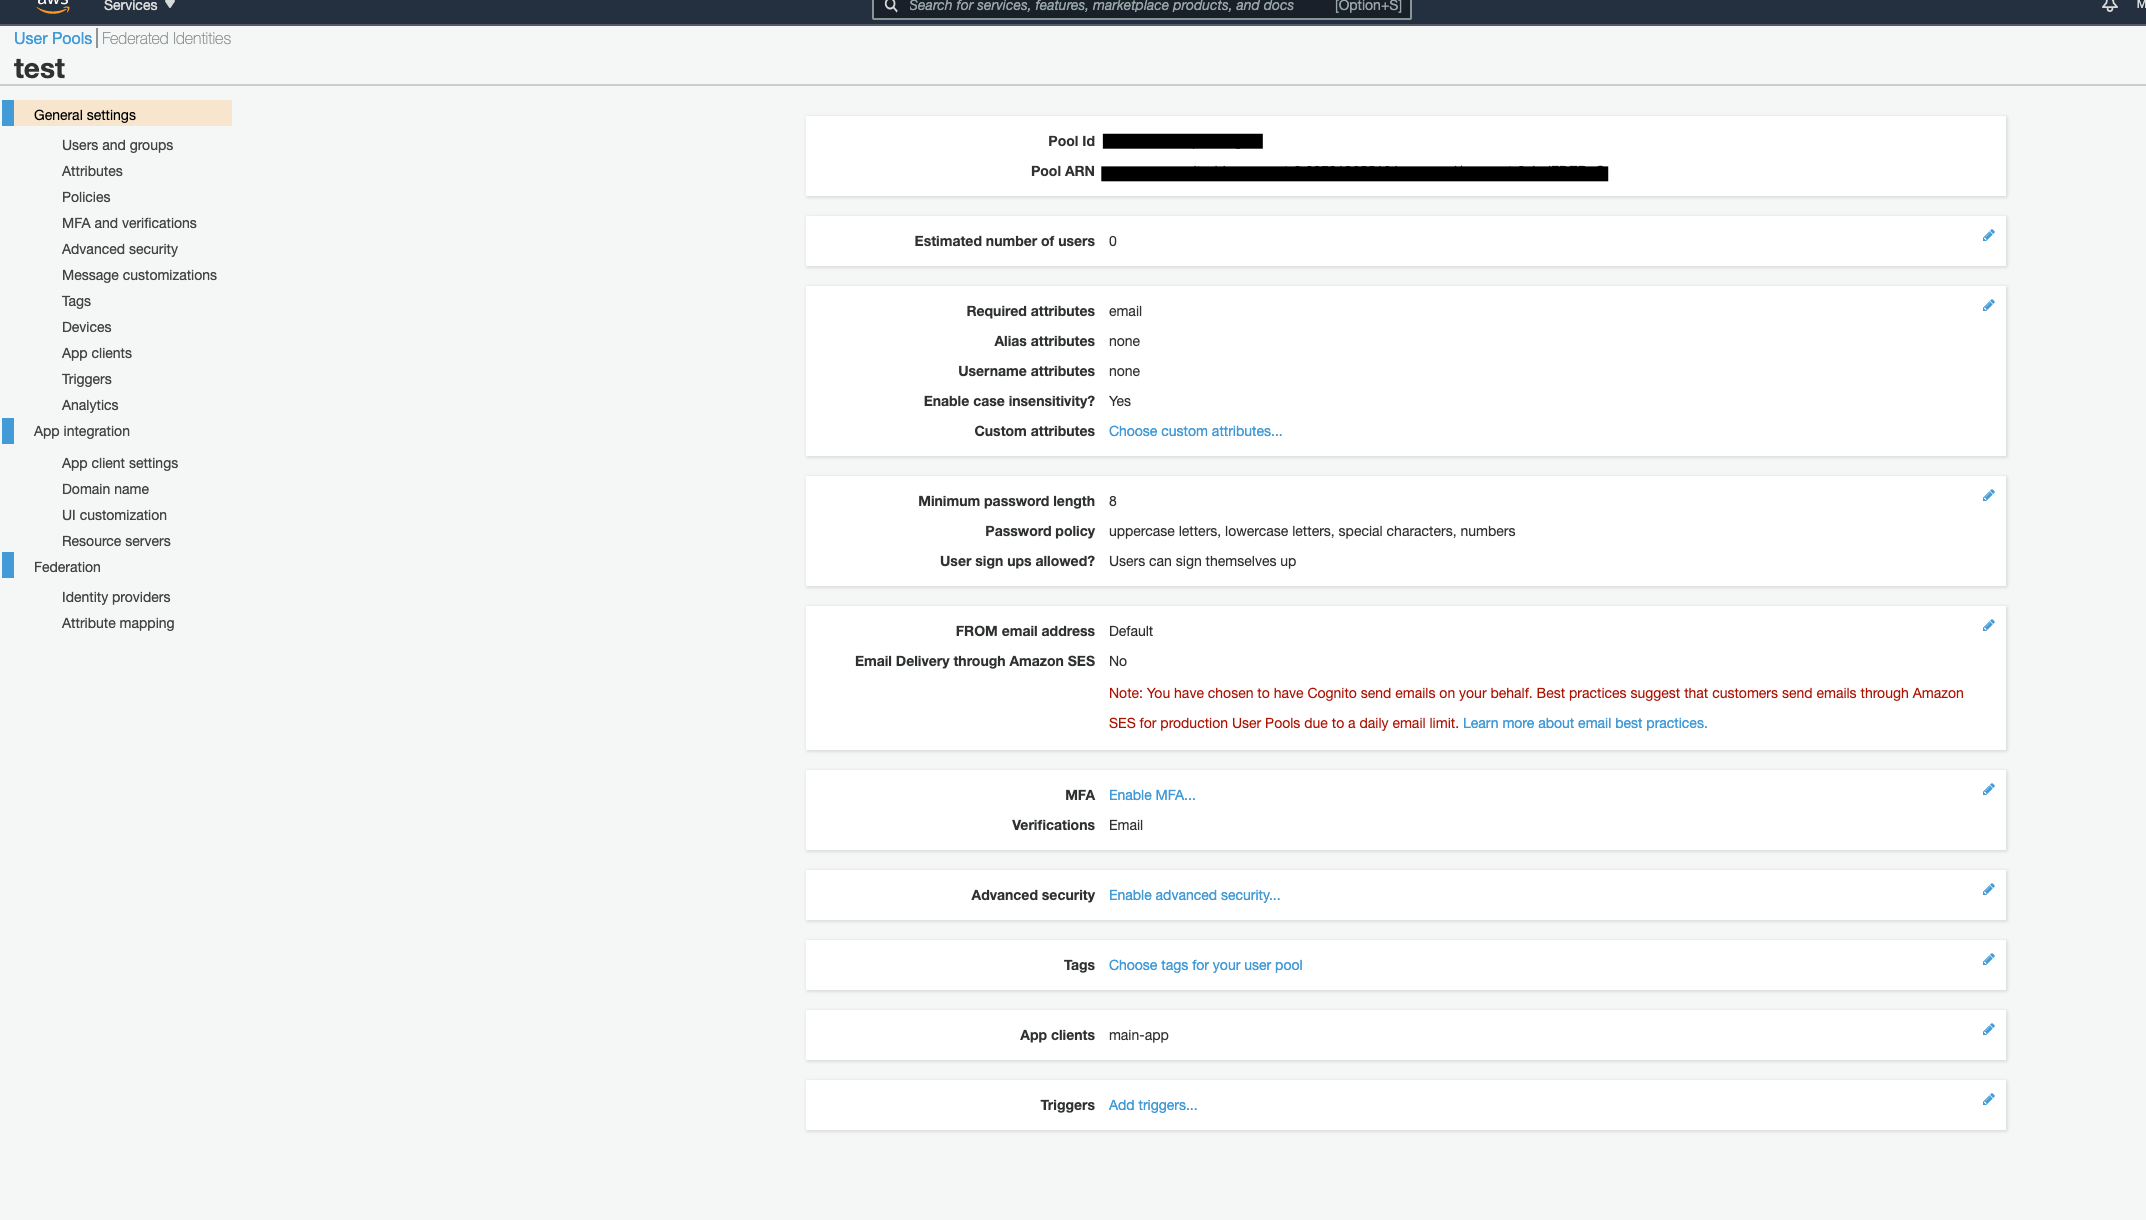
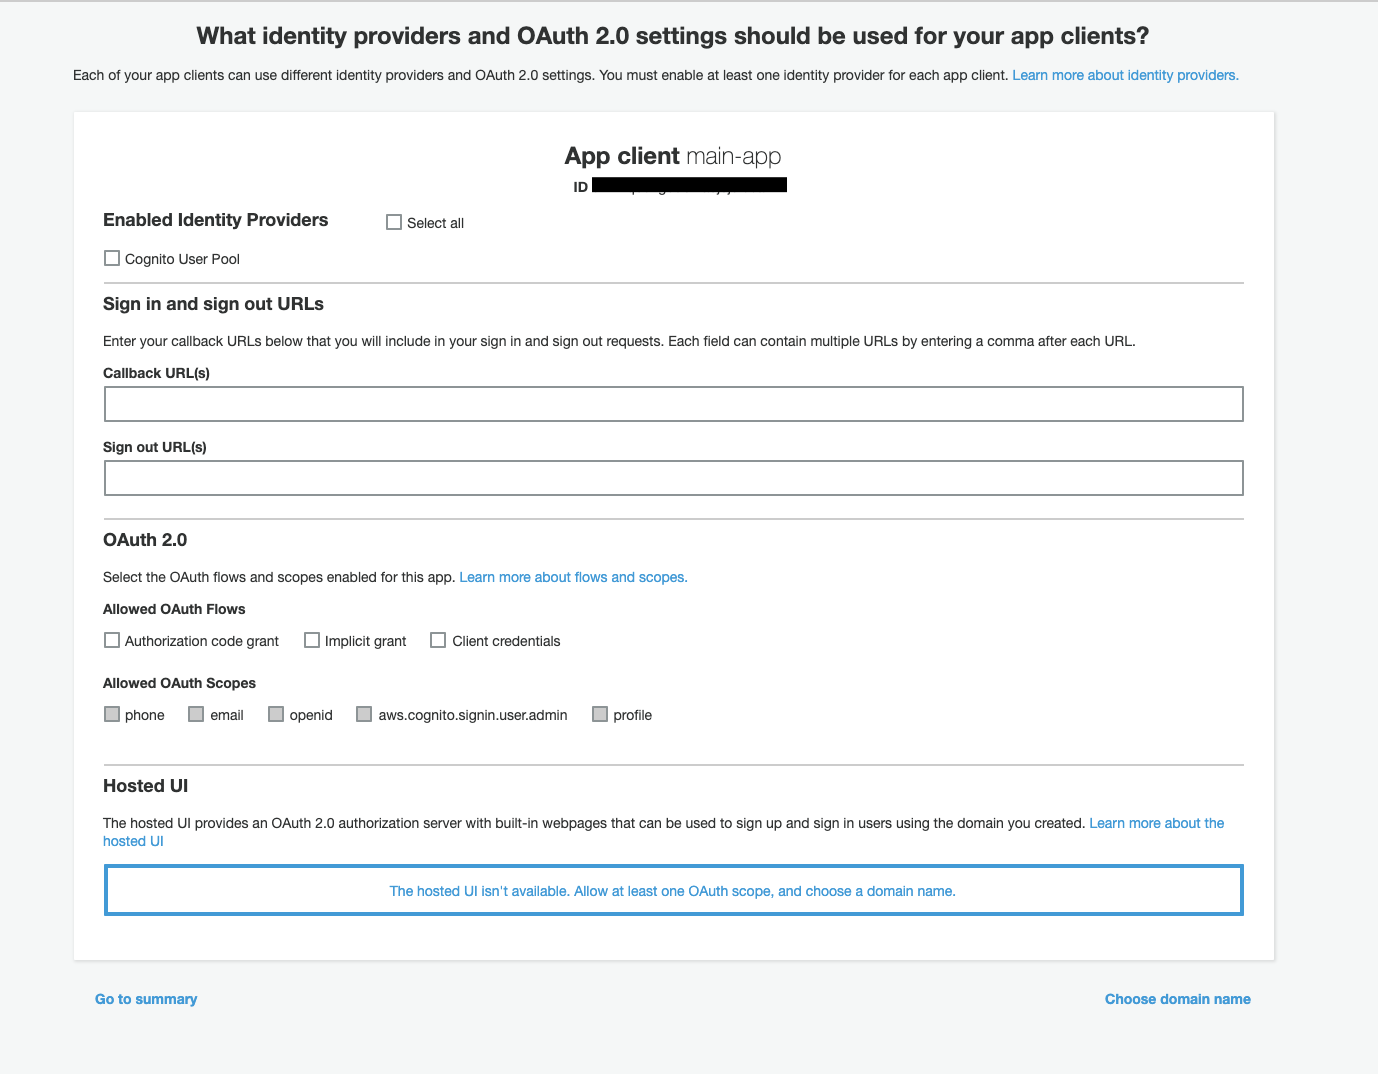
The second one is App client ID. Which is on App client settings under the App integration section. Later, if we want to add authentification using Google, Facebook, etc. to our application – we can specify ‘Sign in’ and callback URLs on this page.
We have ended with creating our Cognito service and now we can use Amazon Web Services SDK or other libraries to interact with it from our code: creating and authenticating users, as well as validating tokens.
Now let write some code. We will create a class that will have two public methods: signUpUser and handleUserAuth.
First of all, we need to create a .env file and save our AWS credentials here.
AWS_ACCESS_KEY_ID=
AWS_SECRET_ACCESS_KEY=in
AWS_REGION=

COGNITO_POOL_ID=
COGNITO_APP_CLIENT_ID=
Also, we need to install a library to easily interact with Cognito from our code using the command:
npm i amazon-cognito-identity-js
Then we need to create user poll property and initialize it in the constructor.
export class CognitoService {
 private readonly userPool: CognitoUserPool;
  constructor() {
   this.userPool = new CognitoUserPool({
     ClientId: process.env.CLIENT_ID,
     UserPoolId: process.env.USER_POOL_ID,
   });
 }
}
After that, we create a method to signup user using the email end password that user inserted.
async signUpUser(user: RegistrationBodyDto): Promise<ISignUpResult> {
   const { email, password } = user;

   const signUpResponse = await this.signUp(email, password);
   const username = signUpResponse.user.getUsername();

   await this.addUserToUserGroup(username, UserRoles.Customer);

   return signUpResponse;
 }

 private async signUp(email: string, password: string): Promise<ISignUpResult> {
   const userAttribute = new CognitoUserAttribute({ Name: 'email', Value: email });

   return await new Promise((resolve, reject) => {
     this.userPool.signUp(email, password, [userAttribute], null, (err, result) =>
       err ? reject(err) : resolve(result),
     );
   });
 }
And now we can create a method to authenticate users as well as generate access, refresh and id tokens.
 async handleUserAuth(id: string, password: string): Promise<LoginResponse> {
   const details = new AuthenticationDetails({
     Username: id,
     Password: password,
   });
   const cognitoUser = this.cognitoUserFactory(id);
   const session = await this.authenticateUser(cognitoUser, details).catch((err) => {
     throw new UnprocessableEntityException(err.message);
   });

   return this.getTokensFromSession(session);
 }

 async authenticateUser(user: CognitoUser, details: AuthenticationDetails): Promise<CognitoUserSession> {
   return await new Promise((resolve, reject) =>
     user.authenticateUser(details, {
       onSuccess: resolve,
       onFailure: (err) => reject(err),
     }),
   );
 }
Now we have a simple class that allows us to use methods to create and authenticate users in our app.
To Sum Up
In this post, we went through the processes necessary to authenticate to an API integration using an AWS Cognito. Given the ease of implementation and the fact that no maintenance is necessary to keep it operating, this is a technique to consider for authenticated API integration. We would be pleased to help you apply such a solution to your software. Fill in the contact form!
What’s your impression after reading this?
Love it!
1
Valuable
1
Exciting
1
Unsatisfied
1
FAQ
Let us address your doubts and clarify key points from the article for better understanding.
YOU MAY ALSO LIKE


Let’s talk!


This site uses cookies to improve your user experience. Read our Privacy Policy
Accept
Share this article