
Wiring Microservices Architecture: Python Case
July 08, 2022 • 1135 Views • 19 min read


Tetiana Stoyko
CTO & Co-Founder
Microservices architecture has already captured the market: according to Statista, more than 75% of companies use this architectural approach. This research also shows, that no matter how big the company is - it is at least considering integration of the microservices. Moreover, it is clear that the bigger company is - the bigger the microservices usage is.
A question may arise from here: "What is microservices architecture and how exactly does it differ from the alternatives?"
Everything You Need to Know About Microservices
To put it simply, microservices is the architecture style of the software system, that appeared as an alternative to monolithic architecture. The main feature of this new approach is that it consists of various independent blocks of code, each of which is responsible for a specific function or feature.
As a result, the whole system becomes more flexible, this approach allows to update or change separate services without interrupting working processes or stopping the entire product. In other words, they make support Continuous Integration and Deployment (CI/CD), so the developers can work with any separate service on demand, knowing that it will not affect the overall working of the application.
In fact, microservices could be compared with the Lego constructor. There are a lot of various elements, that can be combined together and the structure, that consists of these parts can be changed without affecting any of the particular components. Besides, each of these parts can be changed without affecting others.
Microservices vs Monolith
As a matter of fact, these two approaches are the most common competitors. While the microservices approach is about decentralization and separation of various features and functions on the code level, the monolith architecture is about the all-in-one principle, meaning that all of the elements, features, and functions exist as an integral structure.
Actually, monolith architecture is a partly old-fashioned way to structure the code. On the one hand, it is one of the most spread ones and is relatively easy to deploy. On the other hand, it creates a mess inside the code and makes it almost impossible to make rapid updates without further changes to related code components. Obviously, monolithic architecture is not as flexible and comfortable for changes and updates.
However, it is worth mentioning, that probably each developer knows and understands how to develop a monolith vertical structure and how to deal with it. Also, it is much easier to test or debug if needed. Nevertheless, it is recommended to choose the microservices approach, because of the numerous advantages over the previously mentioned architecture, which are possible thanks to the horizontal nature of the architecture.
Pros and Cons of Microservices
In addition to the already mentioned flexibility, microservices architecture proposes a number of additional advantages. For instance, it is easier to understand what each service is responsible for.
Thanks to its structure, when services are separated from each other, it is easier to figure out what function it stands for. As a result, each of the services is tailored for specific purposes, providing the best possible performance.
It is possible to fix the appeared bugs fastly, simply by locating the origin of this bug and the function it is related to. Regardless, it must be said, that in the case of microservices, it is required to perform several additional actions and have some background knowledge in order to fix the bugs, compared to the monolith architecture.
Furthermore, the microservices testing process is more complicated than usual. The reason is that in addition to the testing of each separate service, the developer has to test their connections with others, which eventually leads to the testing of all services separately and complexly. Clearly, it will take more time and resources.
Nonetheless, it allows using various technologies and software. Also, due to the working specifics, it is possible to combine microservices, that are based on various programming languages. For example, the developer can easily combine a python-based service with the one, that was written in JavaScript. So, developers have more freedom and opportunities to use more suitable tools for different tasks and functions.
Microservice in Python
Despite the fact, that microservices can be based on various programming languages, one of the most popular options is Python. In fact, there is a big community of python specialists, who regularly communicate and share their experiences on various forums and blogs.
Also, there are a lot of add-ons and libraries, as well as frameworks, documentation, and other tools, that are associated with Python, and especially related to microservice architecture. Finally, this programming language is one of the easiest to learn.
The number of existing microservice in Python solutions is surprisingly big. The combination of this architectural approach and programming language creates unique offers. For instance, there are at least two different types of microservices in python: all-to-all service and event-driven type.
The all-to-all service is actually similar to the classic development process. For this approach it is typical to develop a partly vertical relationship between the microservices, a chain of microservices, that will be activated one by one. Thence, there will be more strict communication between them. In short, it is as if the monolith architecture is divided into smaller separate blocks.
The alternative, event-driven type is more like service on demand, so the microservice will be triggered after certain predetermined conditions. Mostly, these conditions are the interactions between the user and the application. This approach is a great way to simplify and optimize the services. However, before choosing this approach, it is worth making sure that you have enough resources and the development team is experient enough to build microservice in Python. For instance, the number of communication processes and their complexity will be much higher.
The Role of Microservices Communication
As was mentioned before, one of the main issues with microservices is the communication between them. If the monolith architecture works by degrees and the processes activate each other, the microservices are working more chaotically.
The separation of the services leads to the need for extra sources of communication. Usually, it is provided by additional software, known as message-brokers. They can be predetermined, like in the case of Amazon Web Services, or can be chosen by developers. It can be Apache ActiveMQ, Apache Kafka, IBM MQ, etc. Each of them has its own features and specifics, so it will be hard to explain each of them individually. This is why we propose to use RabbitMQ as an example.
RabbitMQ is open-source software, that is used as a message broker. In fact, it helps to create communication between separate microservices by creating queues.
Example of using RabbitMQ with Python
To make it clear, let's examine how it works on a particular case. Let's create a sync microservice, using RabbitMQ and Python programming language. Let's suppose, that our tech task is:
To create an app, that will scrape information about companies from various sources, save it to the open-source database Postgres, and synchronize it with further analysis and structurization.
Actually, to develop such an app we need more than one or even two microservices. To make it even simpler, let's concentrate only on the Sync microservice. However, we have to remember, that there are other microservices, used for different functions.
First of all, we need to create an asynchronous loop, so the service will permanently run and will wait for the message from RabbitMQ. For this purpose, we will use the ascyncio library, to use the async and await keywords, which are essential tools for interaction with the asynchronous loop. In fact, the asyncio library is a powerful instrument for working with asynchronous loops. On the code level, it will look like this:
if __name__ == '__main__':
  logger.info('Service sync started.')
  loop = asyncio.get_event_loop()
  connection = loop.run_until_complete(main(loop=loop))
  try:
      loop.run_forever()
  except KeyboardInterrupt:
      logger.info('Service sync stopped.')
  except Exception as exc:
      logger.exception(exc)
  finally:
      loop.run_until_complete(connection.close())
Now we build RabbitMQ Client and define processors with unique specified routing keys:
async def main(loop):
   client = Client(settings=rabbit_settings)
  await client.build_client()
  processors = [
      CompanyUpdatedProcessor,
      CompanyInvalidatedProcessor,
      CompanySyncProcessor,
  ]
  await client.subscribe(processors)
  return client.connection
After this, we have to set the attributes for the processor, which serve as an address for the incoming messages. This is needed to sent them to the related queue with the related routing key:
class CompanyUpdatedProcessor(CompanyProcessor):
  processor_name = 'Company arango data updater'
  exchange_name = 'ex.events'
  queue_name = 'q.events.sync-service.company-updated'
  routing_key = 'company-updated'

  def __init__(self, rabbit_client):
      super().__init__(rabbit_client=rabbit_client)
The foregoing sample of source code is an example of one (CompanyUpdated) processor, however, it is similar to two other processors, all you need - is to change the variables.
As a result, we got a loop, that will arrange the incoming messages with the needed processors. Next, we can to build an integration test in order to find out of the incoming message was successfully sent to RabbitMQ and force sync service to save data from message to the database(in our case - ArangoDB):
class Sender:
  def __init__(self):
      credentials = pika.PlainCredentials(RS.USER, RS.PASSWORD)
      parameters = pika.ConnectionParameters(host=RS.HOST, virtual_host=RS.VHOST, port=RS.PORT,
                                              credentials=credentials)
      self.connection = pika.BlockingConnection(parameters)
      self.channel = self.connection.channel()

  def publish(self, msg):
      body = json.dumps(msg).encode()
      self.channel.basic_publish(exchange=Processor.exchange_name, routing_key=Processor.routing_key, body=body)

class Integration:
  def __init__(self):
      self.sender = Sender()
      self.postgres_client = PostgresClient(settings=PS)
      self.postgres_client.build_client()

  async def db(self):
      return await arango_context(
          db_name=AS.DATABASE, host=AS.HOST,
          username=AS.USER, password=AS.PASSWORD)

  async def do_insert(self):
      """Insert test:
          - send message to rabbitmq
          - check is valid data present in arango
      """
      company = get_company()
      key = company['id']
      company_key = f'Company/{key.upper()}'
      message = {'eventType': Processor.routing_key, 'data': company}
      self.sender.publish(message)
      database_connection = await self.db()
      company_collection = database_connection.collection('Company')
      arango_company = await company_collection.get(company_key)
      if not arango_company:
          raise Exception('Failed to fetch arango response')
Synchronization with ArangoDB
Finally, we can proceed to the main part of Sync-Service. Sync-service transforms data, get company location using LocationIQ and save everything to ArangoDB in one transaction. It is our final destination point. ArangoDB is a graph database, so the sync-service is creating nodes (Company, City, State, Country, and Industry) and edges (locate, industry). We use it because in addition to JSON, which is its default storage format, it also uses VelocyPack. It is a binary format for serialization and storage, which is more compact and much faster. Therefore, ArangoDB is one of the best options if you are looking for fast way of write and bulk read:
      graph_connections = {
          'locate': {'from': ['Company'], 'to': ['City', 'Country', 'State']},
          'industry': {'from': ['Company'], 'to': ['Industry']},
      }
In final result, we have to get the graph database, that shows connections of the company, whether it is location or industry, in a graphical way:
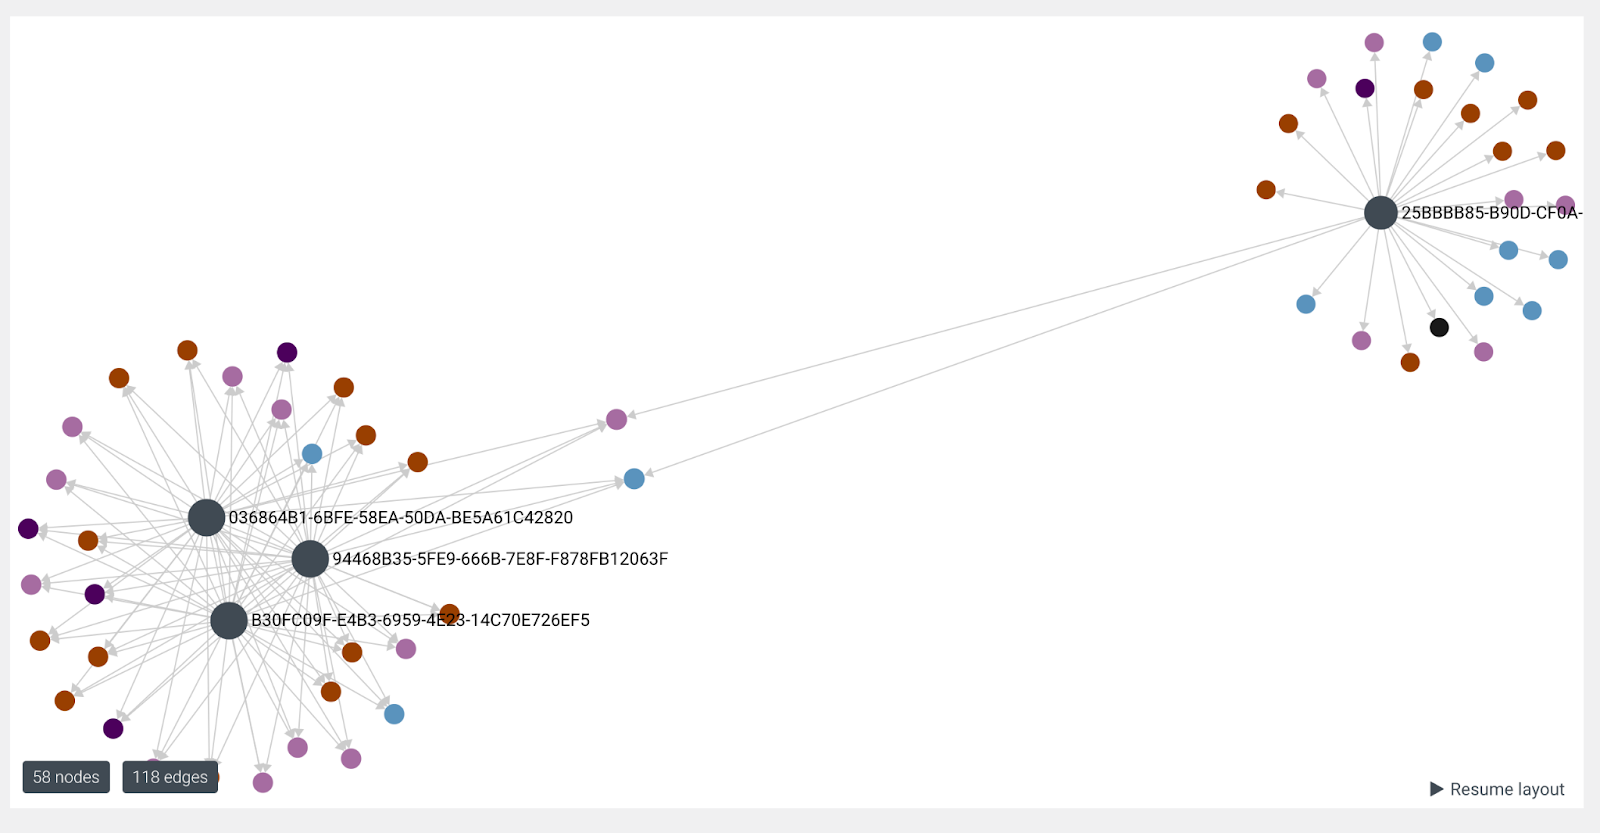
For instance, here is an additional sample of the possible results:
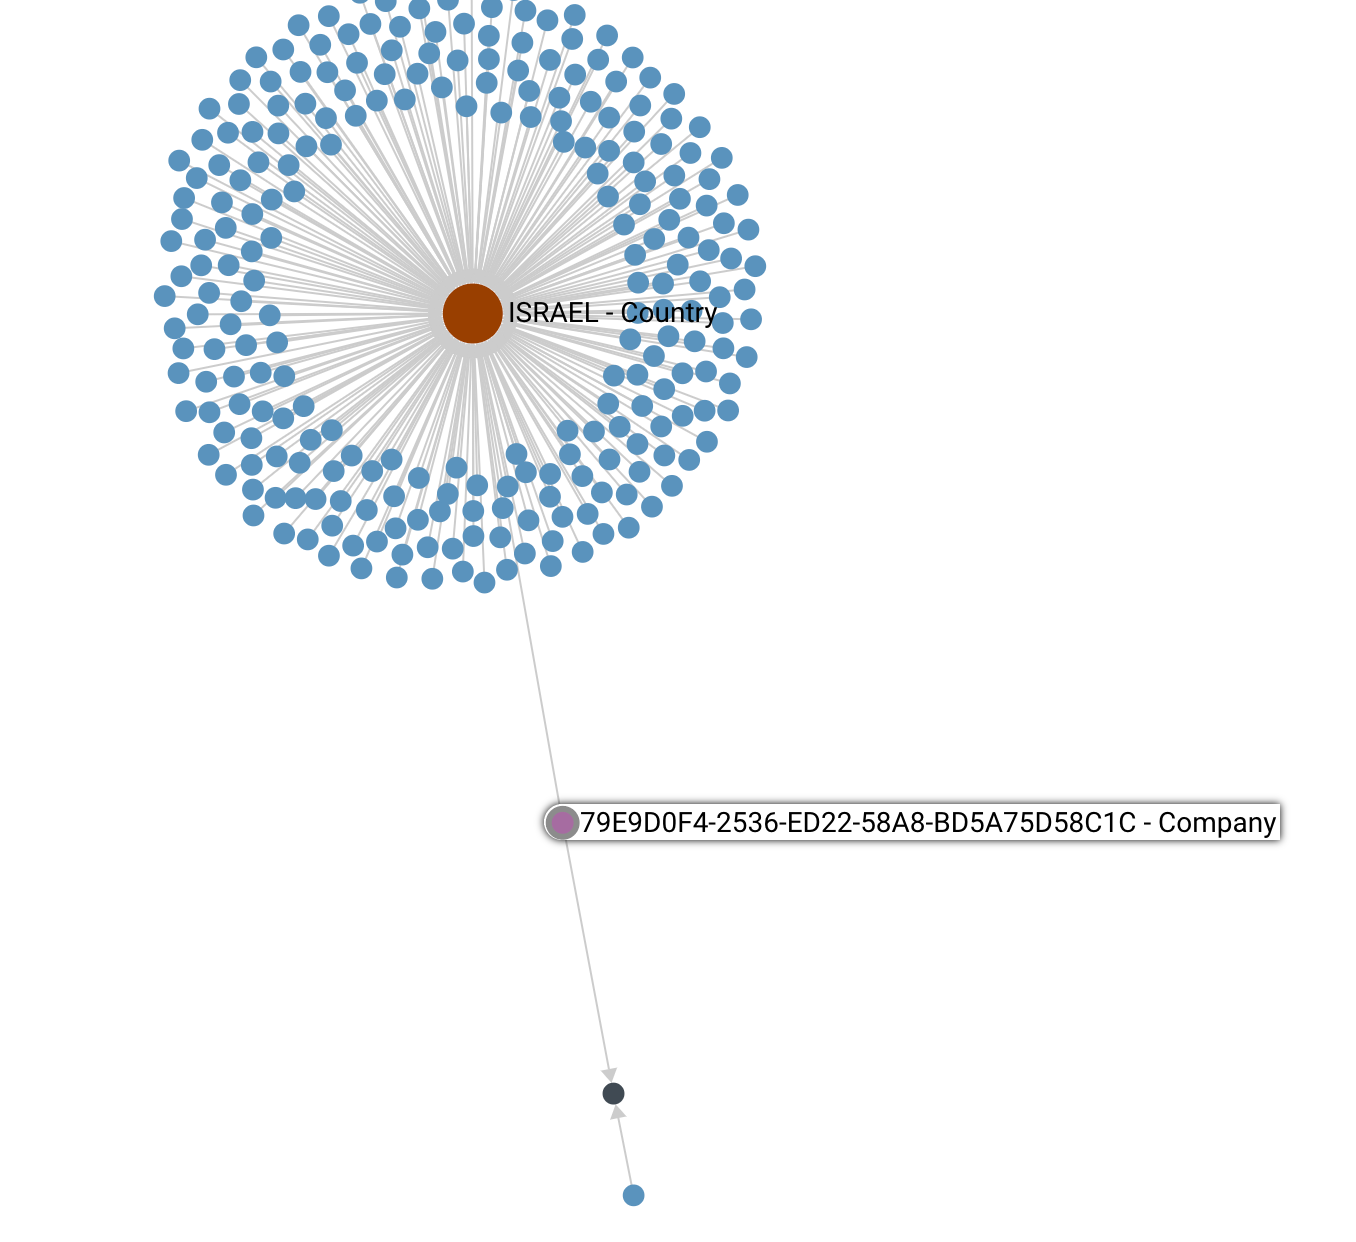
As we can see on the graph, the company (79E9D0F4-2539-ED22-58A8-BD5A75D58C1C) is located in the country (Israel). Moreover, it has some additional connection with other companies (lower blue circle), probably it is the same industry (red circle), because the location of the “Company” is already determined. Companies, related by the location origin are illustrated as the cluster of blue dots around the Country one.
In order to make the graph database and graphs possible, we have to make the creation of nodes (Collections) and edges on the code level.
Source code to create a node:
  async def create_node(self, label, vertex_key, properties=None, replace=False):
      """Method returns vertex_id of entry, created or updated with properties"""
      vertex_id = f'{label}/{vertex_key}'
      txn_col = self.db.collection(label)

      if not await txn_col.has(vertex_key):
          logger.info('Node with vertex_key %s does not exist', vertex_key)
          await txn_col.insert({'_key': vertex_key})
          logger.info('Node is created successfully: %s', vertex_id)

      if replace:
          # Replace vertex content
          await txn_col.replace(properties)
      else:
          # or just update it
          logger.info('Updating node: %s', vertex_id)
          await txn_col.update(properties)
      return vertex_id
Now, we have a cluster of collections, but no edges, which shows the relations between them. Therefore, the source code for the edges will be:
  async def create_edge(self, node1, node2, edge_collection_type, properties=None):
      logger.info('Upsert edge from nodes: %s, %s, %s', node1, node2, edge_collection_type)
      if not properties:
          properties = {}
      label1, key1 = node1.split('/')
      label2, key2 = node2.split('/')

      edge_type = self.graph.edge_collection(edge_collection_type)

      lookup_key = f'{key1}--{edge_collection_type}--{key2}'
      lookup_id = f'{edge_collection_type}/{lookup_key}'
      edge = await self.graph.edge(lookup_id)
      if not edge:
          # create edge
          context = {
              '_key': lookup_key,
              '_from': node1,
              '_to': node2,
          }
          await edge_type.insert(context)
          edge = await self.graph.edge(lookup_id)

      context = {
          '_id': lookup_id,
          'data': properties,
      }

      await self.graph.update_vertex(context)
      return edge
Finally, we`ve got the Sync-service, which will help to synchronize the data, previously gathered and sent to the Senc-service from the RabbitMQ.
Summary
Building microservice architecture is a great alternative to the common monolith one. It is more flexible and easy to work with, for instance, it allows to combine various programming languages. However, it may require more experienced developers and third-party software and databases, like RabbitMQ or its alternatives.
Eventually, it is worth considering building microservice for the new or already existing projects. The amount of their advantages obviously prevails the number of drawbacks.
In case you are considering the development of a new project or improving your product, you are welcome to contact us and get the expertise from competent developers with further development assistance.
What’s your impression after reading this?
Love it!
1
Valuable
1
Exciting
1
Unsatisfied
1
FAQ
Let us address your doubts and clarify key points from the article for better understanding.
you may also like


Let’s talk!


This site uses cookies to improve your user experience.Read our Privacy Policy
Accept
Share this article