


By Tetiana Stoyko
- CTO & Co-Founder
Convert React to Next.js: How to Create Server-side Rendering?
Next.js might be considered as a better solution than React. So in case this fits to your case, learn how to conver your react app to next.js.
Clearly, before explaining how to convert React to Next.js it is worth explaining the reason and advantages of such a process. Therefore, let's briefly discuss both software and its pros and cons.
What Do You Need to Know about ReactJS
Actually, we have already spoken about ReactJS, the reasons why you should and shouldn't use React for your project, and compared it with other alternatives. Therefore, if you are looking for a more detailed explanation, you are welcome to read the previous article.
So as not to repeat ourselves and to avoid unnecessary text injections, let's just briefly sum up the previously mentioned article.
React is an open-source front-end library, based on JavaScript. It is used to develop user interfaces and thanks to some specifics is capable of supporting multiple media components or other visual content.
Among the advantages of using React, we can highlight:
- Supports multiple visual content components.
- Usage of Virtual DOM allows reusing the source code and code blocks.
- React components and hooks can help the developers to manage the code, significantly reducing the need to rewrite the source code parts.
- Open-source JavaScript library and [big community](https://www.statista.com/statistics/1124699/worldwide-developer-survey-most-used-frameworks-web/). As a result, the development team can extend the functionality and improve the performance by integrating various community add-ons, finding some untrivial solutions, or looking for advice from other developers as well.
However, it is obvious, that there are lots of disadvantages too. Clearly, if everything was so great, there would be no need to migrate from this software. So what is wrong with React apps? It is possible to underline several major drawbacks of this library:
- It is a library, not a framework. On the one hand, it is easy to learn and cope with. However, it also creates a lot of restrictions. As a matter of fact, the functionality of React is very limited. As was mentioned before, it is a great tool, that simplifies the work with the visual content components. Yet, It is very hard to develop React app without any additional libraries and frameworks, because the number of its presets and functions is not enough to build a full-fledged standalone application. In other words, React is very dependent on third-party software. If your team is building or migrating a React/Next.js app, our React.js development services cover both client-side and server-side React — including the hydration and SEO-critical rendering decisions this migration hinges on.
- The high pace of updates. Surprisingly, the high pace of updates in the case of React is considered a drawback rather than an advantage. The reason is simple - it is impossible to predict the scale of the update and its aspects. Clearly, each update brings some changes, that are related to the sample code in most cases. Such changes in combination with regular updates create discomfort for the developers, who are forced to figure out what are the changes and make constant corrections to the source code.
- Code Layering is a common issue for this library. As was mentioned before, regular updates provoke constant changes on the code level. Besides, there are no actual rules or standards on how to code on React. Therefore, each developer has their own development approach. This is why it can be difficult to engage new developers in the existing projects because they will need time for adaptation. Probably, the best possible solution to deal with this issue is to make regular checks of the code in order to keep it clean.
- Difficult Search Engine Optimization. Finally, web apps, based on React usually struggle with bad search engine optimization issues. Most modern browser search engines can't correctly work with such apps, they are unable to interact with the React-based webpages. However, the main type of React apps, that struggle with SEO are Single-page apps. The reason is simple - SPA is saved in an HTML file, that provides not enough information about the content of the page. As a result, search engines can't understand it, and therefore index these pages.
Why Migrate from React to Next.js?
Next.js is an open-source framework, based on React. It is even possible to say, that it is a deep modification of React library.
For instance, in addition to common React functions, Next supports server-side rendering, which helps to increase the performance and improves the user experience. Furthermore, Next has improved SEO efficiency. As a result, Next.js provides the same functions as React but also covers its shortcomings.
Frankly speaking, Next.js is a much better choice for a number of reasons. In addition to its SEO-friendly status and improved server-side rendering, as well as React features, it has great potential due to the fact it is a relatively new framework, that keeps growing.
If all the foregoing haven't convinced you, let's briefly list Next.js features:
- Reusable React components. Honestly, it is one of the main reasons why developers mention the possibility to convert React to Next.js. The relation to React allows adopting its components or even entire projects, for instance, already existing React apps.
- Server-side rendering (SSR). Server-side rendering is actually a great feature, worth additional explaining. It is used to improve the response rate, making it faster for the user. In fact, SSR renders HTTP files on the server and sends them to the user. As a result, the visitor gets all the needed data in a single file and gets the opportunity to seamlessly serf the page. It also improves the SEO, because the content of the page is being rendered before the page was even loaded.
- In addition to JavaScript, Next also supports the TypeScript programming language. Thus, it gives even more opportunities for the developers, untying their hands in some specific cases, that are hard to develop using only JavaScript.
- Simple API integration and implementation.
- Simple code-splitting allows to save space and decrease the size of an app.
Among the drawbacks of Next.js we can name:
- Sometimes, the developers will have to develop the project from the scratch due to some limitations of the framework. For instance, various front pages are not supported, so the front-end development is a full-scale task.
- Clearly, Next.js is more complex than the basic React library, therefore there are more requirements for the developers. Additionally, because it is a relatively new framework, the number of experienced developers is low. Hence, it can be a real challenge to find a dedicated and experienced team in case you don't have your own. Also, it can be a tough task to change the team, due to the same specifics as in the case of React: there are no strict rules or code logic, they are highly customized and the new team will need some time to figure it out.
- Finally, the community is still extending, so it may be harder to find ready-made solutions on forums, as well as various add-ons or plugins. However, the situation is changing while Next is growing its popularity.
How to Convert React to Next.js?
Eventually, it is time to talk about the practical side of migration. We decided not to explain each of the steps in detail, but rather to create step-by-step instructions with source code and brief explanations. So what does the migration from React to Next.js looks like on the code level?
1. Dependencies
First of all, let's make changes to the dependencies and scripts in the package.json. Before starting an actual coding we need to remove “react-scripts” and “react-router-dom”. Then, we have to install "next". After these actions, we can start changing the scripts.
For instance, we need "next dev" to start the developer server on "localhost:3000", "next build" for creating a production build, and "next start" for running this build:
{
"name": "migration-to-next-from-react",
"version": "0.1.0",
"private": true,
"dependencies": {
  "next": "^12.2.0",
  "react": "^18.2.0",
  "react-dom": "^18.2.0"
},
"scripts": {
  "dev": "next dev",
  "start": "next start",
  "build": "next build"
},
}
2. Assets and Entry Points
After the dependencies were changed and new scripts are created, we can transfer our assets such as videos, photos, and any other static assets to the "public" directory. The reason is simple - React uses the "public" folder to keep static assets and entry HTML files. In Next.js we use this folder just for assets:
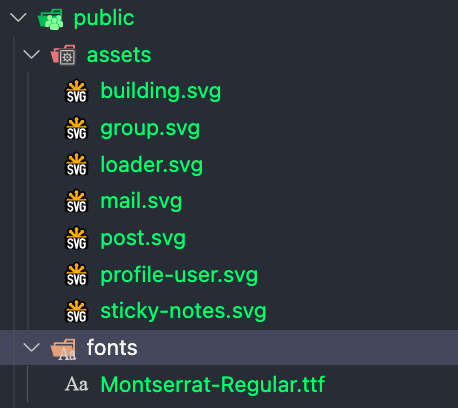 Click to expand
To perform the foregoing action, we need to migrate all contests of <head> from index.html to _document.js. Replace <head> and <html> tags with custom components from the Next.js library. Add <Main /> and <NextScript /> into <body>. Any external scripts, that we used into <head> we also need to add in _document.js:
import Document, { Html, Head, Main, NextScript } from "next/document";

class MyDocument extends Document {
render() {
  return (
    <Html>
      <Head>
        <meta charset="utf-8" />

        <link rel="icon" href="./favicon.png" />
        <link rel="preconnect" href="https://fonts.googleapis.com" />
        <link rel="preconnect" href="https://fonts.gstatic.com" crossOrigin />

        <title>Easy migration to next!</title>
      </Head>

      <body>
        <Main />
        <NextScript />
      </body>
    </Html>
  );
}
}

export default MyDocument;
Then, we need to create the _app.js entry point. Here you can migrate all shared layouts. It’s worth stopping hydration on the server-side because our app might use some browser API, such as “window”, that does not exist on the server. So, we can create the custom wrapper <StopHydrationWrapper> or something like that:
const StopHydrationWrapper = ({ children }) => {
return <div>{typeof window === "undefined" ? null : children}</div>;
};

const MyApp = ({ Component, pageProps }) => {
return (
  <StopHydrationWrapper>
    <Component {...pageProps} />
  </StopHydrationWrapper>
);
};

export default MyApp;
Important things to know:
-
_document.js and _app.js must be in the “pages” directory ( ./pages/_app.js ).
-
The “next” folder is a folder that contains our static build. So, we must add “.next” to “.gitignore”.
3. Routing and Linking
Next.js has a filesystem-based router based on the concept of pages. Once the file is added to the “pages” directory, it is automatically available as a route. Usually, in React apps we use the “react-router-dom" library for routing. So, we must convert our React router system to the build-in Next.js router:
- Create an index.js file in the “pages” directory. This will be the index page of our application. It must contain code that displays the homepage or any other index page of our React application.
- Replace all components, that are rendered by <Route /> to the “pages” directory. For routes with dynamic content ( “/posts/:userId”) use square brackets that wrap file name (“pages/posts/[userId]”). For example, this is routing before converting:
<Switch>
          <Route path="/users" render={() => <Users />} />
          <Route path="/posts/:userId?" render={() => <Posts />} />
          <Route
            path="/post/:postId?"
            render={() => <PostDetails />}
          />
</Switch>
And this is converted Next.js routing:
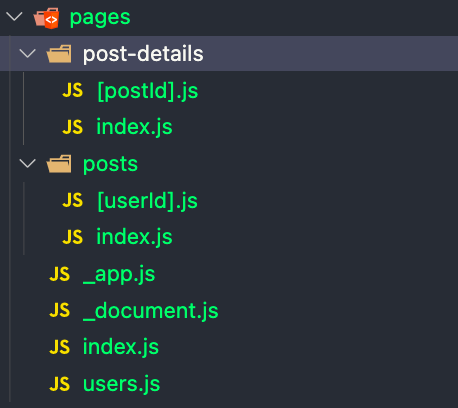 Click to expand
- We also recommend creating the “./components” folder for any other components, which are contained on pages
- Next, you should replace all <Link /> components, that import from “react-router-dom” with <Link /> component that imports from “next/link”, and change the “to” prop to “href”.
4. Search Engine Optimization
For SEO we must add ‘title’ and ‘meta’ tags to the <Head> component on all our pages. This is how it can look:
<>
        <Head>
          <title>{seoTitle}</title>
          <meta property="og:type" content="article" />
          <meta name="description" content={seoDescription} />
          <meta name="keywords" content={seoKeywords} />
        </Head>

        <Users />
</>
5. Data Fetching
Usually, the React.js app fetches data for components in the “useEffect” hook. But if we do fetching in this way, we will make requests on the client-side. For server-side data fetching in Next.js, we will use the “getStaticProps” and “getServerSideProps” functions. When they are executed is the primary distinction between “getServerSideProps” and “getStaticProps”. Every time a user makes a new request to the page, “getServerSideProps” is executed. And “getStaticProps” runs when static pages are built.
- So “getServerSideProps” is useful when the user makes a request and you don’t know what he sends in the params of the request:
const User = ({ user }) => {
return (
  <div>
    <img src={user.avatar} alt={user.name} />
    <div>
      <span>{user.name}</span>
      <span>{user.email}</span>
    </div>
  </div>
);
};

export async function getServerSideProps(context) {
const { id } = context.query;
const user = await getUser(id);

return {
  props: {
    user,
  },
};
}

export default User;
- The “getStaticProps” is better when we are aware of the user's request during the build time:
const Posts = ({ posts }) => {
return (
  <div>
    {posts.map((post) => (
      <Post key={post.id} post={post} />
    ))}
  </div>
);
};

export async function getStaticProps() {
const posts = await getPosts();

return {
  props: {
    posts,
  },
};
}
As a result, if you have done all the previous steps correctly - Congratulation, you have successfully migrated from React to Next.js as well as set up some of the basic features for your app. Clearly, if there are any additional functions or features you want to implement, you can do it as well.
Summary
We hope that this brief explanation and tutorial will help you to better understand all the possible advantages of converting React to Next.js and can become a basic setup for the future transformation of your project.
Clearly, each software has its own pros and cons, however, we highly encourage you to perform such migration as soon as possible. The reasons are simple: Next.js allows you to use most React functions and provides more additional features and instruments.
It would be fair to assume, that Next.js is a deep modification of React, that helps to develop full-fledged standalone applications without using additional software. Moreover, the migration process itself is very simple and won't take much time. Also, such simplicity enables the possibility to develop apps, based on React and afterward transfer them to Next if needed. If you wonder what apps can be developed with React, or what functionality is possible - you can examine some of our cases.
FAQ


YOU MAY ALSO LIKE


Get in Touch
Got no clue where to start? Why don’t we discuss your idea?

Just pick a time. No forms.


This site uses cookies to improve your user experience. Read our Privacy Policy
Accept