
Detailed Tutorial on How to Build Micro Frontend Based on Angular
February 04, 2022 • 5747 Views • 26 min read


Tetiana Stoyko
CTO & Co-Founder
In this digital time, the form of a web application is getting larger and more sophisticated, so frequently they need to be handled by multiple teams. Your web application might have features developed by different teams and sometimes it’s better to release only certain features into production before delivering the entire web application.
Most of these sophisticated apps live on the client side which makes it harder to maintain. With a monolithic big web application, there are some other issues as well. However, as applications get more complex over time, requiring on-the-fly scalability and high responsiveness, a micro-frontend design based on Angular components is becoming increasingly effective in addressing these requirements.
Micro Frontend is a concept that considers a website or web application as a collection of features controlled by separate teams. Each team is dedicated to and specialized in a specific area of business or purpose. Such a cross-functional team creates functionality from top to bottom, from server to user interface.
Benefits of Micro Frontend Architecture
Automation of CI/CD pipeline: Since each app integrates and deploys independently, it simplifies the CI/CD pipeline. Because all functionalities are separate, you don’t have to worry about the entire program while introducing a new feature. If there is a little error with the code in a module, the CI/CD pipeline will break the entire build process.
Team flexibility: Numerous teams can add value to multiple systems while working separately.
Single responsibility: Such an approach enables each team to build components with a single responsibility. Each Micro Frontend team focus 100% on the functionality of their Micro Frontend.
Reusability: You will be able to use code in multiple places. One created and delivered module can be reused by multiple teams.
Technology agnosticism: Micro Frontend architecture is independent of technology. You can use components from different web development frameworks (React, Vue, Angular, etc.).
Simple learning: Smaller modules are easier to learn and understand for new developers entering the teams, than a monolithic architecture with a huge code structure.
Getting started
We have a micro frontend architecture displayed in the picture below:
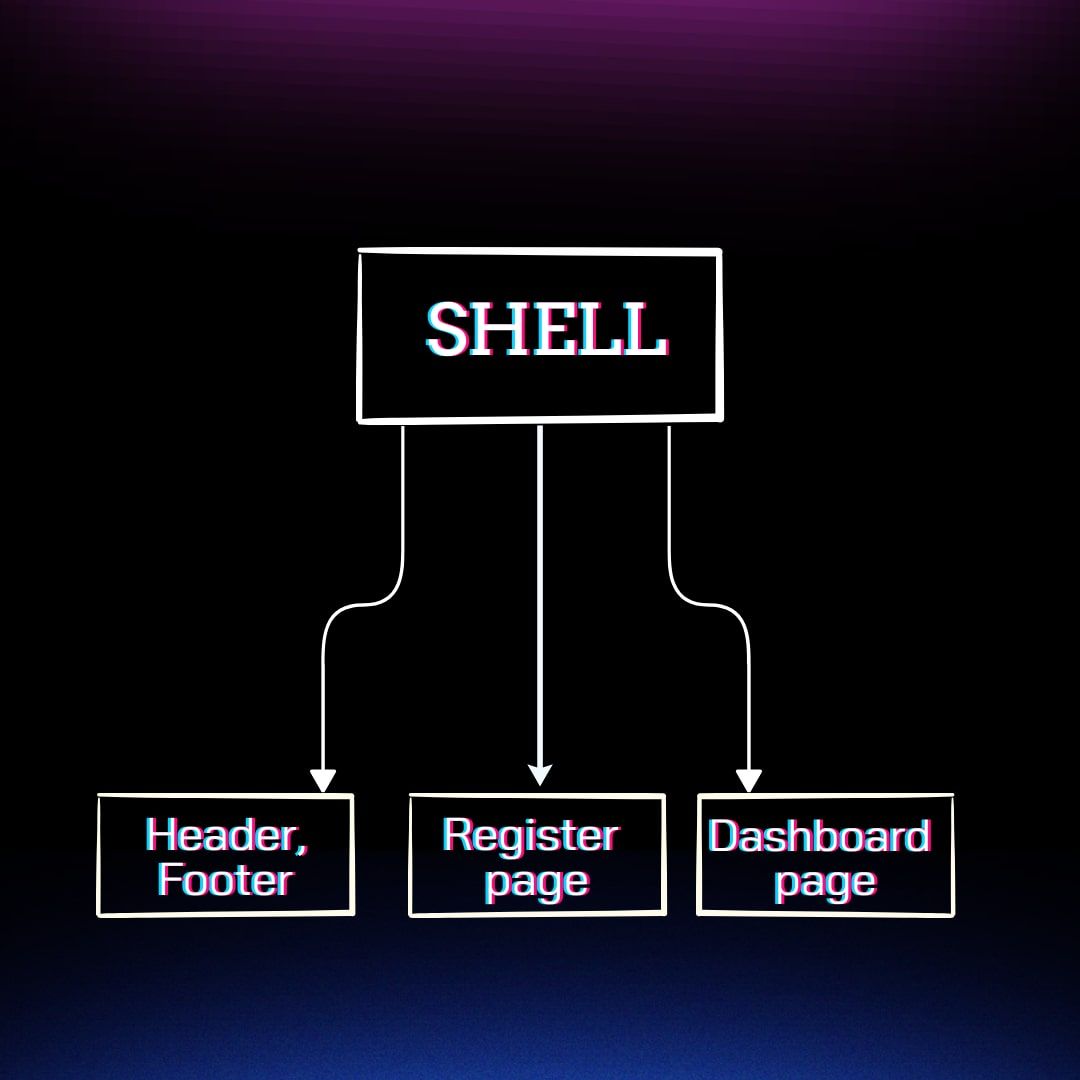
Please note:
In our article, each part is a separated Angular web application and needs to be deployed independently.
Header & Footer Module federation
This part contains at least 2 components ready to be exported from this module.
First of all, we need to create a new app and set up a custom angular builder (this builder allow us to use custom webpack configs)
ng new layout
  npm i  --save-dev ngx-build-plus
Now we need to create webpack.config.js and webpack.prod.config.js files at the root of our app.
// webpack.config.js
const webpack = require("webpack");
const ModuleFederationPlugin =require("webpack/lib/container/ModuleFederationPlugin");

module.exports = {
  output: {
    publicPath: "http://localhost:4205/",
    uniqueName: "layout",
  },
  optimization: {
    runtimeChunk: false,
  },
  plugins: [
    new ModuleFederationPlugin({
      name: "layout",
      library: { type: "var", name: "layout" },
      filename: "remoteEntry.js",
      exposes: {
        Header: './src/app/modules/layout/header/header.component.ts',
        Footer: './src/app/modules/layout/footer/footer.component.ts'
      },
      shared: {
        "@angular/core": { singleton: true, requiredVersion:'auto' },
        "@angular/common": { singleton: true, requiredVersion:'auto' },
        "@angular/router": { singleton: true, requiredVersion:'auto' },
      },
    }),
  ],
};

// webpack.prod.config.js

module.exports = require("./webpack.config");
Module federation allows us to share common npm packages between different frontends, so it will reduce payload for lazy-loaded chanks. We can set up the minimum required version, is allowed two or more versions for one package, etc. More details about possible plugin options are here.
Please note:
We have an exposed section, so here we can define which items we need to allow to export from our micro-frontend app. In our case, we export only 2 components.
After that we need to add a custom config file into angular.json and change the default builder to ngx-build-plus:
{
  ...
  "projects": {
    "layout": {
      "projectType": "application",
      "schematics": {
        "@schematics/angular:component": {
          "style": "scss"
        },
        "@schematics/angular:application": {
          "strict": true
        }
      },
      "root": "",
      "sourceRoot": "src",
      "prefix": "app",
      "architect": {
        "build": {
          "builder": "ngx-build-plus:browser",
          "options": {
            "outputPath": "dist/layout",
            "index": "src/index.html",
            "main": "src/main.ts",
            "polyfills": "src/polyfills.ts",
            "tsConfig": "tsconfig.app.json",
            "inlineStyleLanguage": "scss",
            "assets": [
              "src/favicon.ico",
              "src/assets"
            ],
            "styles": [
              "src/styles.scss"
            ],
            "scripts": [],
            "extraWebpackConfig": "webpack.config.js"
          },
          "configurations": {
            "production": {
              "budgets": [
                {
                  "type": "initial",
                  "maximumWarning": "500kb",
                  "maximumError": "1mb"
                },
                {
                  "type": "anyComponentStyle",
                  "maximumWarning": "2kb",
                  "maximumError": "4kb"
                }
              ],
              "extraWebpackConfig": "webpack.prod.config.js",
              "fileReplacements": [
                {
                  "replace": "src/environments/environment.ts",
                  "with": "src/environments/environment.prod.ts"
                }
              ],
              "outputHashing": "all"
            },
            "development": {
              "buildOptimizer": false,
              "optimization": false,
              "vendorChunk": true,
              "extractLicenses": false,
              "sourceMap": true,
              "namedChunks": true
            }
          },
          "defaultConfiguration": "production"
        },
        "serve": {
          "builder": "ngx-build-plus:dev-server",
          "configurations": {
            "production": {
              "browserTarget": "layout:build:production"
            },
            "development": {
              "browserTarget": "layout:build:development",
              "extraWebpackConfig": "webpack.config.js",
              "port": 4205
            }
          },
          "defaultConfiguration": "development"
        },
        "extract-i18n": {
          "builder": "@angular-devkit/build-angular:extract-i18n",
          "options": {
            "browserTarget": "layout:build"
          }
        },
        "test": {
          "builder": "ngx-build-plus:karma",
          "options": {
            "main": "src/test.ts",
            "polyfills": "src/polyfills.ts",
            "tsConfig": "tsconfig.spec.json",
            "karmaConfig": "karma.conf.js",
            "inlineStyleLanguage": "scss",
            "assets": [
              "src/favicon.ico",
              "src/assets"
            ],
            "styles": [
              "src/styles.scss"
            ],
            "scripts": [],
            "extraWebpackConfig": "webpack.config.js"
          }
        }
      }
    }
  },
  "defaultProject": "layout"
}
Register page Module federation
This web application will contain all logic for the login/register page.
The main flow is almost the same, we need to create a new app and install a custom builder for using custom webpack configs.
ng new registerPage
npm i  --save-dev ngx-build-plus
After that, we need to create webpack.config.js and webpack.prod.config.js
// webpack.config.js
const webpack = require("webpack");

const ModuleFederationPlugin = require("webpack/lib/container/ModuleFederationPlugin");

module.exports = {
  output: {
    publicPath: "http://localhost:4201/",
    uniqueName: "register",
  },
  optimization: {
    runtimeChunk: false,
  },
  plugins: [
    new ModuleFederationPlugin({
      name: "register",
      library: { type: "var", name: "register" },
      filename: "remoteEntry.js",
      exposes: {
        RegisterPageModule:
          "./src/app/modules/register/register-page.module.ts",
      },
      shared: {
        "@angular/core": { singleton: true, requiredVersion: 'auto' },
        "@angular/common": { singleton: true, requiredVersion: 'auto' },
        "@angular/router": { singleton: true, requiredVersion: 'auto' },
      },
    }),
  ],
};


// webpack.prod.config.js

module.exports = require("./webpack.config");
As you can see, here we export only RegisterPageModule. This module we can use like a lazy-loaded module in our shell app.
Also, we need to change the default builder to ngx-build-plus and add webpack configs into the angular JSON file (the same as we did for the Header & Footer module before).
Dashboard Module Federation
This module presents some data for an authorized user. The same approach as for Register page, but with personal webpack configs:
// webpack.config.js
const webpack = require("webpack");
const ModuleFederationPlugin = require("webpack/lib/container/ModuleFederationPlugin");

module.exports = {
  output: {
    publicPath: "http://localhost:4204/",
    uniqueName: "dashboard",
  },
  optimization: {
    runtimeChunk: false,
  },
  plugins: [
    new ModuleFederationPlugin({
      name: "dashboard",
      library: { type: "var", name: "dashboard" },
      filename: "remoteEntry.js",
      exposes: {
        DashboardModule:
          "./src/app/modules/dashboard/dashboard.module.ts",
      },
      shared: {
        "@angular/core": { singleton: true, requiredVersion:'auto'  },
        "@angular/common": { singleton: true, requiredVersion:'auto'  },
        "@angular/router": { singleton: true, requiredVersion:'auto'  },
      },
    }),
  ],
};
Shell app Module Federation
Main app that loads all separated micro frontend modules into one app. Like before, we create a new app with a custom angular builder:
ng new shell
npm i  --save-dev ngx-build-plus
Add custom webpack configs:
// webpack.config.js
const webpack = require("webpack");
const ModuleFederationPlugin = require("webpack/lib/container/ModuleFederationPlugin");

module.exports = {
  output: {
    publicPath: "http://localhost:4200/",
    uniqueName: "shell",
  },
  optimization: {
    runtimeChunk: false,
  },
  plugins: [
    new ModuleFederationPlugin({
      shared: {
        "@angular/core": { eager: true, singleton: true },
        "@angular/common": { eager: true, singleton: true },
        "@angular/router": { eager: true, singleton: true },
      },
    }),
  ],
};
But before we need to set up webpack config with the custom builder into angular.json file.
In environment/environment.ts we declare all module configurations (for the prod version we need to replace localhost address by deployed public address):
export const environment = {
  production: false,

  microfrontends: {
    dashboard: {
      remoteEntry: 'http://localhost:4204/remoteEntry.js',
      remoteName: 'dashboard',
      exposedModule: ['DashboardModule'],
    },

    layout: {
      remoteEntry: 'http://localhost:4205/remoteEntry.js',
      remoteName: 'layout',
      exposedModule: ['Header', 'Footer'],
    }
  }
};
Then we need to add a loading Dashboard and register page where it is required. First of all, we need to create utils for module federation, where we can load remote modules from other apps.
// src/app/utils/federation-utils.ts
type Scope = unknown;
type Factory = () => any;
interface Container {
  init(shareScope: Scope): void;
  get(module: string): Factory;
}
declare const __webpack_init_sharing__: (shareScope: string) => Promise<void>;
declare const __webpack_share_scopes__: { default: Scope };
const moduleMap: Record<string, boolean> = {};
function loadRemoteEntry(remoteEntry: string): Promise<void> {
  return new Promise<void>((resolve, reject) => {
    if (moduleMap[remoteEntry]) {
      return resolve();
    }
    const script = document.createElement('script');
    script.src = remoteEntry;
    script.onerror = reject;
    script.onload = () => {
      moduleMap[remoteEntry] = true;
      resolve(); // window is the global namespace
    };
    document.body.append(script);
  });
}
async function lookupExposedModule<T>(
  remoteName: string,
  exposedModule: string
): Promise<T> {
  // Initializes the share scope. This fills it with known provided modules from this build and all remotes
  await __webpack_init_sharing__('default');
  const container = window[remoteName] as Container;
  // Initialize the container, it may provide shared modules
  await container.init(__webpack_share_scopes__.default);
  const factory = await container.get(exposedModule);
  const Module = factory();
  return Module as T;
}

export interface LoadRemoteModuleOptions {
  remoteEntry: string;
  remoteName: string;
  exposedModule: string;
}

export async function loadRemoteModule<T = any>(
  options: LoadRemoteModuleOptions
): Promise<T> {
  await loadRemoteEntry(options.remoteEntry);
  return lookupExposedModule<T>(
    options.remoteName,
    options.exposedModule
  );
}
And utils for building lazy loaded routes:
// src/app/utils/route-utils.ts
import { loadRemoteModule } from './federation-utils';
import { Routes } from '@angular/router';
import { APP_ROUTES } from '../app.routes';
import { Microfrontend } from '../core/services/microfrontends/microfrontend.types';

export function buildRoutes(options: Microfrontend[]): Routes {
  const lazyRoutes: Routes = options.map((o) => ({
    path: o.routePath,
    loadChildren: () => loadRemoteModule(o).then((m) => m[o.ngModuleName]),
    canActivate: o.canActivate,
    pathMatch: 'full'
  }));

  return [
    ...APP_ROUTES,
    ...lazyRoutes
  ];
}
Then we need to define a micro frontend service:
// src/app/core/services/microfrontends/microfrontend.service.ts
import { Injectable } from '@angular/core';
import { Router } from '@angular/router';
import { MICROFRONTEND_ROUTES } from 'src/app/app.routes';
import { buildRoutes } from 'src/app/utils/route-utils';

@Injectable({ providedIn: 'root' })
export class MicrofrontendService {
  constructor(private router: Router) {}

  /*
   * Initialize is called on app startup to load the initial list of
   * remote microfrontends and configure them within the router
   */
  initialise(): Promise<void> {
    return new Promise<void>((resolve) => {
      this.router.resetConfig(buildRoutes(MICROFRONTEND_ROUTES));
      return resolve();
    });
  }
}
And file for type:
// src/app/core/services/microfrontends/microfrontend.types.ts
import { LoadRemoteModuleOptions } from "src/app/utils/federation-utils";

export type Microfrontend = LoadRemoteModuleOptions & {
  displayName: string;
  routePath: string;
  ngModuleName: string;
  canActivate?: any[]
};
Then we need to declare remote modules according to the routes:
// src/app/app.routes.ts
import { Routes } from '@angular/router';
import { LoggedOnlyGuard } from './core/guards/logged-only.guard';
import { UnloggedOnlyGuard } from './core/guards/unlogged-only.guard';
import { Microfrontend } from './core/services/microfrontends/microfrontend.types';
import { environment } from 'src/environments/environment';

export const APP_ROUTES: Routes = [];

export const MICROFRONTEND_ROUTES: Microfrontend[] = [
  {
    ...environment.microfrontends.dashboard,
    exposedModule: environment.microfrontends.dashboard.exposedModule[0],

    // For Routing, enabling us to ngFor over the microfrontends and dynamically create links for the routes
    displayName: 'Dashboard',
    routePath: '',
    ngModuleName: 'DashboardModule',
    canActivate: [LoggedOnlyGuard]
  },
  {
    ...environment.microfrontends.registerPage,
    exposedModule: environment.microfrontends.registerPage.exposedModule[0],

    displayName: 'Register',
    routePath: 'signup',
    ngModuleName: 'RegisterPageModule',
    canActivate: [UnloggedOnlyGuard]
  }
]
And use our Micro Frontend Service in the main app module:
// src/app/app.module.ts
import { APP_INITIALIZER, NgModule } from '@angular/core';
import { BrowserModule } from '@angular/platform-browser';
import { RouterModule } from '@angular/router';

import { AppRoutingModule } from './app-routing.module';
import { AppComponent } from './app.component';
import { APP_ROUTES } from './app.routes';
import { LoaderComponent } from './core/components/loader/loader.component';
import { NavbarComponent } from './core/components/navbar/navbar.component';
import { MicrofrontendService } from './core/services/microfrontends/microfrontend.service';

export function initializeApp(
  mfService: MicrofrontendService
): () => Promise<void> {
  return () => mfService.initialise();
}

@NgModule({
  declarations: [
    AppComponent,
    NavbarComponent,
    LoaderComponent
  ],
  imports: [
    BrowserModule,
    AppRoutingModule,
    RouterModule.forRoot(APP_ROUTES, { relativeLinkResolution: 'legacy' }),
  ],
  providers: [
    MicrofrontendService,
    {
      provide: APP_INITIALIZER,
      useFactory: initializeApp,
      multi: true,
      deps: [MicrofrontendService],
    },
  ],
  bootstrap: [AppComponent]
})
export class AppModule { }
Now we need to load our Footer and Header components. For that we need to update the app component:
// src/app/app.component.html
<main>
  <header #header></header>
  <div class="content">
    <app-navbar [isLogged]="auth.isLogged"></app-navbar>
    <div class="page-content">
      <router-outlet *ngIf="!loadingRouteConfig else loading"></router-outlet>
      <ng-template #loading>
        <app-loader></app-loader>
      </ng-template>
    </div>
  </div>
  <footer #footer></footer>
</main>
and file src/app/app.component.ts will look like this:
import {
  ViewContainerRef,
  Component,
  ComponentFactoryResolver,
  OnInit,
  AfterViewInit,
  Injector,
  ViewChild
} from '@angular/core';
import { RouteConfigLoadEnd, RouteConfigLoadStart, Router } from '@angular/router';
import { loadRemoteModule } from './utils/federation-utils';
import { environment } from 'src/environments/environment';

@Component({
  selector: 'app-root',
  templateUrl: './app.component.html',
  styleUrls: ['./app.component.scss']
})
export class AppComponent implements AfterViewInit, OnInit{
  @ViewChild('header', { read: ViewContainerRef, static: true })
  headerContainer!: ViewContainerRef;

  @ViewChild('footer', { read: ViewContainerRef, static: true })
  footerContainer!: ViewContainerRef;

  loadingRouteConfig = false;

  constructor(private injector: Injector,
    private resolver: ComponentFactoryResolver,
    private router: Router
    ) {}

  ngOnInit() {
    this.router.events.subscribe(event => {
      if (event instanceof RouteConfigLoadStart) {
          this.loadingRouteConfig = true;
      } else if (event instanceof RouteConfigLoadEnd) {
          this.loadingRouteConfig = false;
      }
    });
  }

  ngAfterViewInit(): void {
    // load header
    loadRemoteModule({
      ...environment.microfrontends.layout,
      exposedModule: environment.microfrontends.layout.exposedModule[0],
    })
      .then(module => {
        const factory = this.resolver.resolveComponentFactory(module.HeaderComponent);
        this.headerContainer?.createComponent(factory, undefined, this.injector);
      });

    // load footer
    loadRemoteModule({
      ...environment.microfrontends.layout,
      exposedModule: environment.microfrontends.layout.exposedModule[1],
    })
      .then(module => {
        const factory = this.resolver.resolveComponentFactory(module.FooterComponent);
        this.footerContainer?.createComponent(factory, undefined, this.injector);
      });
  }
}
Here we have logic for loaders and logic for lazy-loaded components (Header, Footer).
Communication Between Micro Frontends
We have few ways to share data between different micro frontends. More details are described here.
In our case, we have decided to use Custom Event for communication. Custom Event allows us to send custom data via Event payload.
One module should dispatch custom events like this:
const busEvent = new CustomEvent('app-event-bus', {
        bubbles: true,
        detail: {
          eventType: 'auth-register',
          customData: 'some data here'
        }
      });
      dispatchEvent(busEvent);
Other modules can subscribe to this event:
onEventHandler(e: CustomEvent) {
    if (e.detail.eventType === 'auth-register') {
      const isLogged = Boolean(localStorage.getItem('token'));
      this.auth.isLogged = isLogged;
      if (isLogged) {
        this.router.navigate(['/']);
      } else {
        this.router.navigate(['/signup']);
      }
    }
  }

  ngOnInit() {
    this.$eventBus = fromEvent<CustomEvent>(window, 'app-event-bus').subscribe((e) =>   this.onEventHandler(e));
   // ...
  }
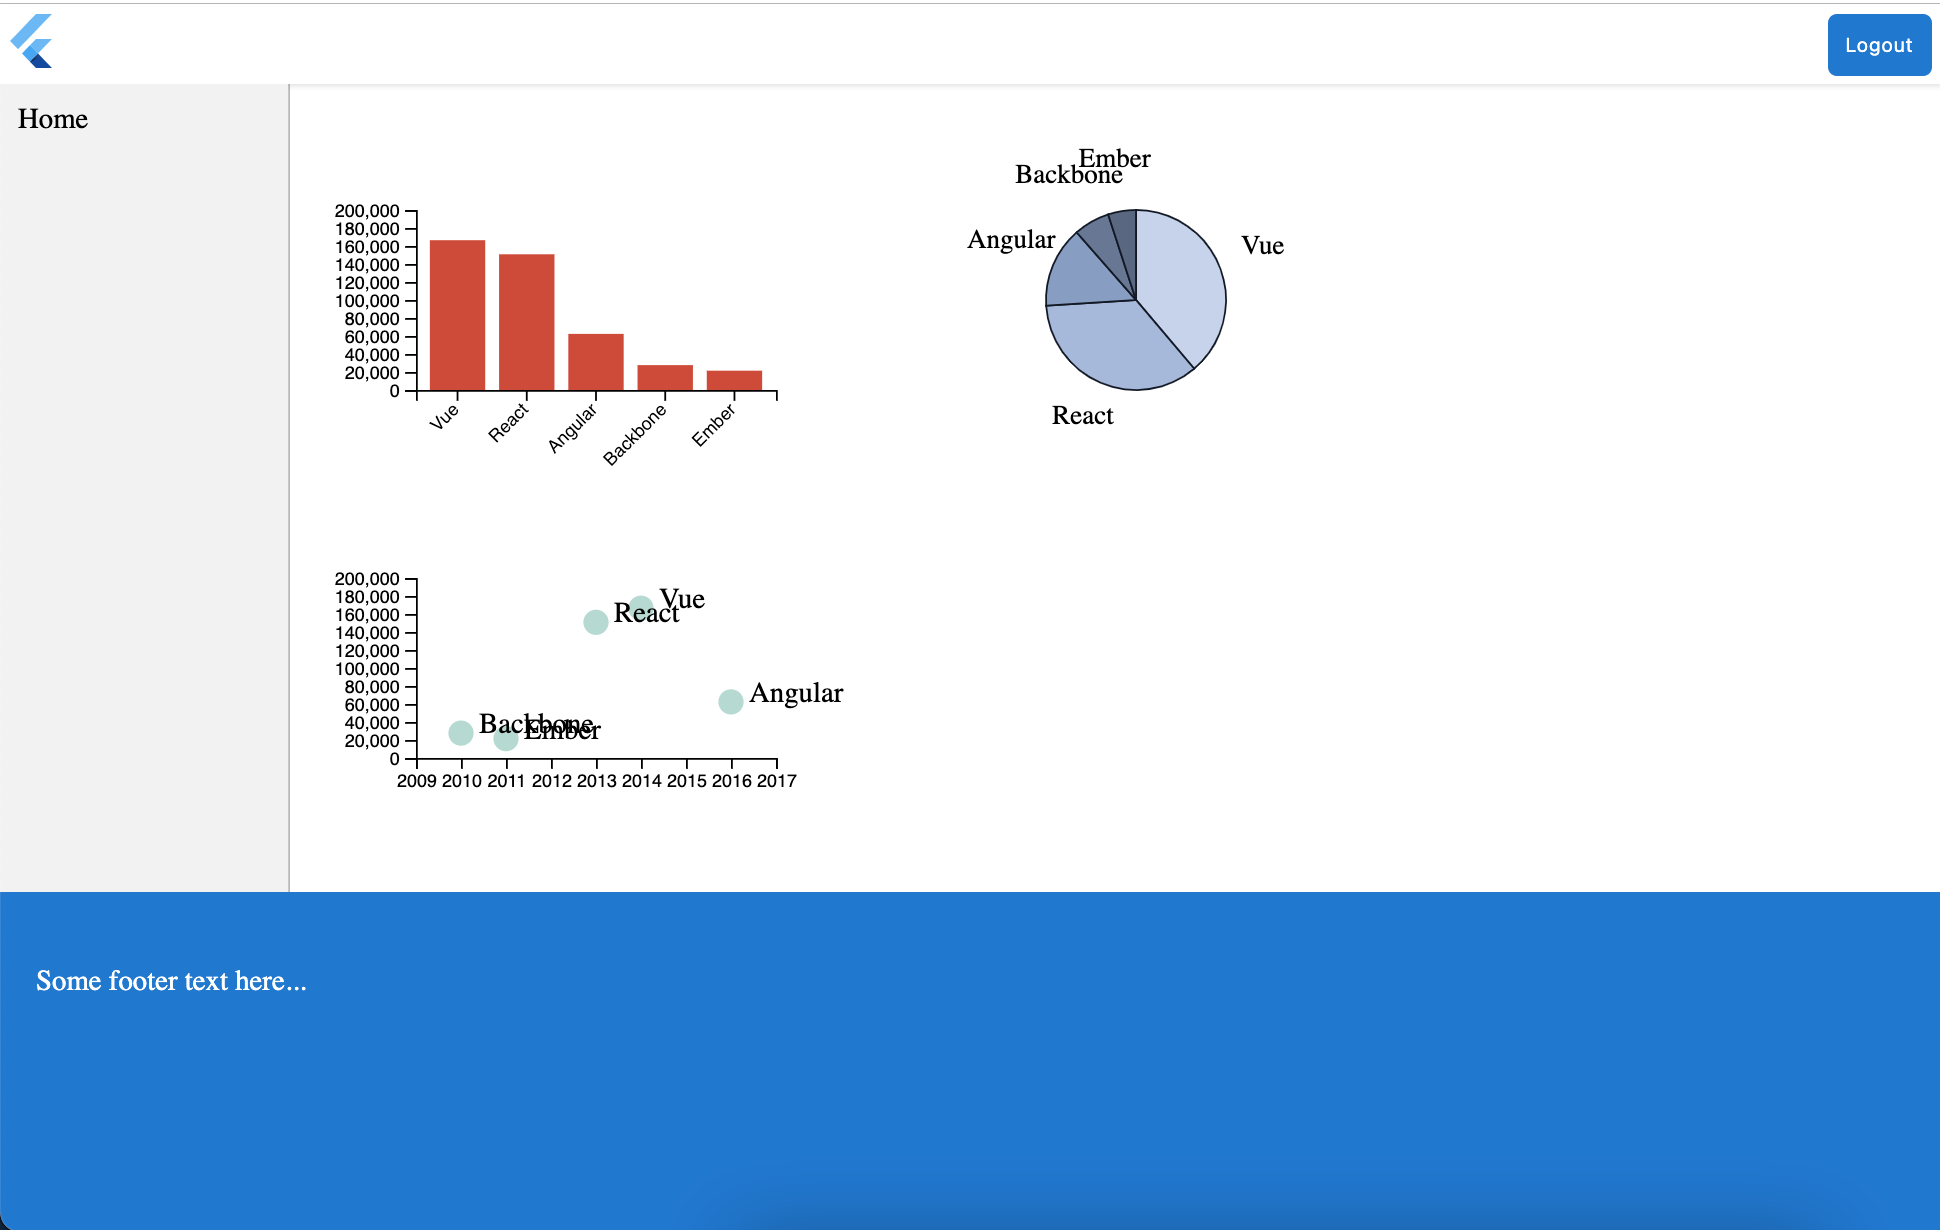
Demo preview
For unauthorized users:

For authorized users:
Conclusion
We see a rising demand for more manageable micro frontend architectures as frontend codebases get more sophisticated over time. So it is crucial to be able to draw clear boundaries that establish the right levels of coupling and cohesion between technical and domain entities, as well as scale software delivery across independent, autonomous teams.
If you’re intimidated by micro frontend architecture but still want to develop an app, let us set up all of these operations for you so that you can just receive a finished product.
Useful links:
Share this post
Tags
What’s your impression after reading this?
Love it!
Valuable
Exciting
Unsatisfied
YOU MAY ALSO LIKE


Let’s talk!


This site uses cookies to improve your user experience.Read our Privacy Policy
Accept