
Crypto
Microservices Infrastructure with Kubernetes: Blockchain Case
August 25, 2022 • 1265 Views • 24 min read


Tetiana Stoyko
CTO & Co-Founder
Nowadays it becomes a challenge to develop a good software product due to a wide range of different solutions. It can be embarrassing even for a person who has a lot of experience in the software development processes but didn’t build any reliable and scalable solutions from scratch.
In this article, we will make an overview of the microservice infrastructure that we have managed to launch. It can easily deal with high loads and continue to be responsive and very fast in processing users’ requests.
The described project was developed for the cryptocurrency and blockchain market. Therefore, we had to take into account some specifics, including the blockchain technology features, and meet its requirements.
For instance, blockchain technology can cause some performance issues as well as overloads. Moreover, due to the growth of the cryptocurrency and blockchain market, new products can easily interest various active blockchain technology users. Therefore, we had to preserve the application from overloading in case of a large influx of users.
Product requirements
Our product is an ambitious crypto industry solution that allows users to hold, buy, exchange, and transfer crypto products or assets. Everyone can register there by going through a verification process and using the product for personal needs.
It becomes obvious that such kind of project will be very complex, containing a lot of different features that have to work together. The product has to be robust and fast at the same time. What is more, we need to provide an ability to work for a few teams on the project in parallel keeping the source code base clean and scalable.
Usually, projects have a clear roadmap of required features, however, It’s a big challenge to make such a roadmap for crypto products especially when you are going to work on some features that don’t have any analogs on the market. It means that our microservice architecture has to be flexible and resistant to any changes during the development process.
Technologies that we used
The project started as a start-up and had a limited budget. The client paid attention that we will have regular demos for investors where we should regularly show progress in the development of new features. We made a decision to use such technologies as:
- Node JS (NestJS framework) for backend development - Nest JS supports typescript out-of-the-box and forces using a modular structure where every feature can be isolated and easily connected/disconnected to/from other modules.
- PostgreSQL database - for gathering data.
- Kafka JS - for building communication between microservices and serving incoming loading
- Kubernetes(k8s) + Helm charts - for deployment purposes. It will allow us to make scalable microservices infrastructure with easy rollout on any cloud platform(we used AWS EKS)
- Flutter - for iOS and Android mobile applications development
- React - for web version and admin panel
Development process
For the first stage, our main purpose was to split our application into microservices.
Kafka is good not only for service communication but also for load balancing allowing to process input data one by one. It can increase processing time when we have a lot of customers, however, service will be, at least, alive.
Read also: Wiring Microservices Architecture: Python Case
What is more, if we have enough resources on the cluster, we can spawn additional consumers for the group which handles some events, decreasing delays and speeding up our task processing.
In our case, we made a decision to create 6 microservices.
- Admin microservice - used for all logic related to the admin panel which, obviously, should be isolated from functionality used by the user.
- Core microservice - contains logic, related to users and their accounts. Authorization, gifts, profiles, charts, etc. However, this microservice doesn’t perform the financial service functions: it doesn’t make any payment and exchange operations.
- Payment microservice - is a financial service, that contains logic for a deposit, withdrawal, exchange, and trade logic. Integrations with CEX and DeFi solutions will be there.
- Mails and notifications service - microservice is responsible for sending emails, push notifications, and any other kinds of notifications for the user. It has a separate queue in Kafka, which holds requests from other microservices for sending notifications/emails to users.
- Cron tasks service - microservice sends scheduled events for task processing. Microservice doesn’t process tasks by itself. Holding such a microservice is useful to avoid skipping iteration of cron task, when processing service, for example, is unavailable due to deployment or crash. The event will be kept in a queue waiting for execution.
- Webhooks microservice - its purpose is to not skip any event from external APIs which can be very important, holding transaction status or other valuable data. It places such events in the queues(depending on sender API) and processes them.
Let’s find out how to make these microservices on NestJS.
We need to make configuration options for the Kafka messages broker. Therefore, we created a shared resources folder for the common modules and configurations of all microservices.
Microservices configuration options
import { ClientProviderOptions, Transport } from '@nestjs/microservices';

import CONFIG from '@application-config';

import { ConsumerGroups, ProjectMicroservices } from './microservices.enum';

const { BROKER_HOST, BROKER_PORT } = CONFIG.KAFKA;


export const PRODUCER_CONFIG = (name: ProjectMicroservices): ClientProviderOptions => ({

 name,

 transport: Transport.KAFKA,

 options: {

   client: {

     brokers: [`${BROKER_HOST}:${BROKER_PORT}`],

   },

 }

});


export const CONSUMER_CONFIG = (groupId: ConsumerGroups) => ({

 transport: Transport.KAFKA,

 options: {

   client: {

     brokers: [`${BROKER_HOST}:${BROKER_PORT}`],

   },

   consumer: {

     groupId

   }

 }

});
Let’s connect our Admin panel microservice to Kafka in consumer mode. It will allow us to catch and handle events from topics.
Make the app work in microservice mode for the ability to consume events
app.connectMicroservice(CONSUMER_CONFIG(ConsumerGroups.ADMIN));

 await app.startAllMicroservices();
We can notice that the consumer config includes groupId. It’s an important option that will allow consumers from the same group to get events from topics and distribute them to each other to process them faster.
For example, if our microservice receives events faster than it can process them, we can make autoscaling to spawn additional pods to share loading between them and make the process twice faster.
To make this possible, consumers should be in the group, and after scaling, spawned pods will be in the same group too. So, they will be able to share loading instead of handling the same topic events from different Kafka partitions.
Let’s check an example of how to catch and process Kafka events in NestJS:
Consumer controller
import { Controller } from '@nestjs/common';

import { Ctx, KafkaContext, MessagePattern, EventPattern, Payload } from '@nestjs/microservices';


@Controller('consumer')

export class ConsumerController {

 @MessagePattern('hero')

 readMessage(@Payload() message: any, @Ctx() context: KafkaContext) {

   return message;

 }


 @EventPattern('event-hero')

 sendNotif(data) {

   console.log(data);

 }

}
Consumers can work in 2 modes. It receives events and processes them without returning any response(EventPattern decorator), or returns the response to the producer after processing an event(MessagePattern decorator). EventPattern is better and should be preferred if possible as it doesn’t contain any additional source code layers to provide request/response functionality.
What about producers?
For connecting producers, we need to provide producer configuration for a module that will be responsible for sending events.
Producer connection
import { Module } from '@nestjs/common';

import DatabaseModule from '@shared/database/database.module';

import { ClientsModule } from '@nestjs/microservices';

import { ProducerController } from './producer.controller';

import { PRODUCER_CONFIG } from '@shared/microservices/microservices.config';

import { ProjectMicroservices } from '@shared/microservices/microservices.enum';


@Module({

 imports: [

   DatabaseModule,

   ClientsModule.register([PRODUCER_CONFIG(ProjectMicroservices.ADMIN)]),

 ],

 controllers: [ProducerController],

 providers: [],

})

export class ProducerModule {}
Event-based producer
import { Controller, Get, Inject } from '@nestjs/common';

import { ClientKafka } from '@nestjs/microservices';

import { ProjectMicroservices } from '@shared/microservices/microservices.enum';


@Controller('producer')

export class ProducerController {

 constructor(

   @Inject(ProjectMicroservices.ADMIN)

   private readonly client: ClientKafka,

 ) {}


 @Get()

 async getHello() {

   this.client.emit('event-hero', { msg: 'Event Based'});

 }

}
Request/response-based producer
import { Controller, Get, Inject } from '@nestjs/common';

import { ClientKafka } from '@nestjs/microservices';

import { ProjectMicroservices } from '@shared/microservices/microservices.enum';


@Controller('producer')

export class ProducerController {

 constructor(

   @Inject(ProjectMicroservices.ADMIN)

   private readonly client: ClientKafka,

 ) {}


 async onModuleInit() {

   // Need to subscribe to a topic

   // to make the response receiving from Kafka microservice possible

   this.client.subscribeToResponseOf('hero');

   await this.client.connect();

 }


 @Get()

 async getHello() {

   const responseBased = this.client.send('hero', { msg: 'Response Based' });

   return responseBased;

 }

}
Each microservice can work in any of two modes(producer/consumer) or in both modes(mixed) at the same time. Usually, microservices use mixed mode for load balancing purposes, generating events to the topic and consuming them evenly sharing the loading.
Kubernetes configuration based on Helm chart templates, implemented for each microservice.
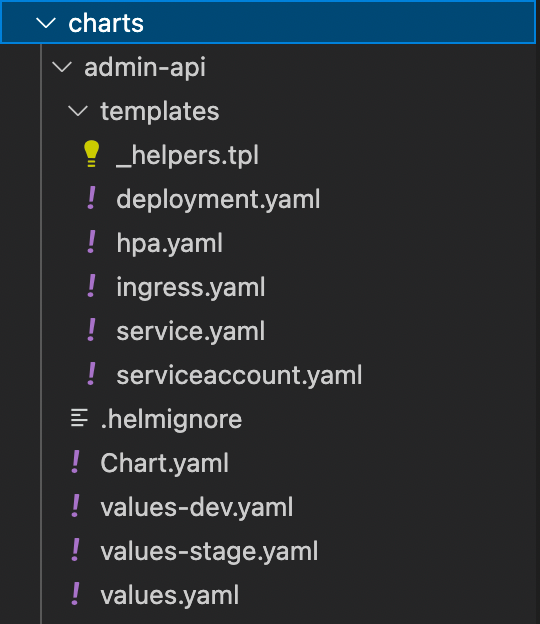
The template consists of a few configuration files:
- deployment
- hpa(horizontal pod autoscaler)
- ingress controller
- service
Let’s look at each configuration file (without Helm templating)
Admin-API deployment
apiVersion: apps/v1

kind: Deployment

metadata:

 name: admin-api

spec:

 replicas: 1

 selector:

   matchLabels:

     app: admin-api

 template:

   metadata:

     labels:

       app: admin-api

   spec:

     containers:

     - name: admin-api

       image: xxx208926xxx.dkr.ecr.us-east-1.amazonaws.com/project-name/stage/admin-api

       resources:

         requests:

           cpu: 250m

           memory: 512Mi

         limits:

           cpu: 250m

           memory: 512Mi

       ports:

         - containerPort: 80

       env:

         - name: NODE_ENV

           value: production


         - name: APP_PORT

           value: "80"
Deployment can contain more thin configurations like resource limits, health check configuration, update strategy, etc. However, We provide a basic configuration example, which can be extended depending on the needs of any other project.
Admin-API service
---

apiVersion: v1

kind: Service

metadata:

 name: admin-api

spec:

 selector:

   app: admin-api

 ports:

   - name: admin-api-port

     port: 80

     targetPort: 80

     protocol: TCP

 type: NodePort
We need to expose service to the outside world, to use it. Let’s expose our app via a load balancer and provide SSL configuration to use a secure HTTPS connection.
We need to install a load balancer controller on our cluster. Here is the most popular solution: AWS Load Balancer Controller.
Then, we need to create ingress with the following configuration:
Admin-API ingress controller
apiVersion: networking.k8s.io/v1

kind: Ingress

metadata:

 namespace: default

 name: admin-api-ingress

 annotations:

   alb.ingress.kubernetes.io/load-balancer-name: admin-api-alb

   alb.ingress.kubernetes.io/ip-address-type: ipv4

   alb.ingress.kubernetes.io/tags: Environment=production,Kind=application

   alb.ingress.kubernetes.io/scheme: internet-facing

   alb.ingress.kubernetes.io/certificate-arn: arn:aws:acm:us-east-2:xxxxxxxx:certificate/xxxxxxxxxx

   alb.ingress.kubernetes.io/listen-ports: '[{"HTTP": 80}, {"HTTPS":443}]'

   alb.ingress.kubernetes.io/healthcheck-protocol: HTTPS

   alb.ingress.kubernetes.io/healthcheck-path: /healthcheck

   alb.ingress.kubernetes.io/healthcheck-interval-seconds: '15'

   alb.ingress.kubernetes.io/ssl-redirect: '443'

   alb.ingress.kubernetes.io/group.name: admin-api

spec:

 ingressClassName: alb

 rules:

   - host: example.com

     http:

       paths:

         - path: /*

           pathType: ImplementationSpecific

           backend:

             service:

               name: admin-api

               port:

                 number: 80
After applying this configuration, a new alb load balancer will be created and we need to create a domain with the name which we provided in the ‘host’ parameter and route traffic from this host to our load balancer.
Admin-API autoscaling configuration
apiVersion: autoscaling/v2beta1

kind: HorizontalPodAutoscaler

metadata:

 name: admin-api-hpa

spec:

 scaleTargetRef:

   apiVersion: apps/v1

   kind: Deployment

   name: admin-api

 minReplicas: 1

 maxReplicas: 2

 metrics:

   - type: Resource

     resource:

       name: cpu

       targetAverageUtilization: 90
What about Helm?
Helm becomes very useful when we want to reduce the complexity of our k8s infrastructure. Without this tool - we need to write a lot of yml files before we can run it on a cluster.
Also, we should keep in mind relations between applications, labels, names, etc. However, we can make everything simpler with Helm. It works similar to the package manager, allowing us to create a template of the app and then prepare and run it using simple commands.
Let’s use helm to make our templates:
Admin-API deployment (Helm chart)
apiVersion: apps/v1

kind: Deployment

metadata:

 name: {{ .Values.appName }}

spec:

 replicas: {{ .Values.replicas }}

 selector:

   matchLabels:

     app: {{ .Values.appName }}

 template:

   metadata:

     labels:

       app: {{ .Values.appName }}

   spec:

     containers:

     - name: {{ .Values.appName }}

       image: {{ .Values.image.repository }}:{{ .Values.image.tag }}"

       imagePullPolicy: {{ .Values.image.pullPolicy }}

       ports:

       - containerPort: {{ .Values.internalPort }}

       {{- with .Values.env }}

       env: {{ tpl (. | toYaml) $ | nindent 12 }}

       {{- end }}
Admin-API service(Helm chart)
apiVersion: v1

kind: Service

metadata:

 name: {{ .Values.global.appName }}

spec:

 selector:

   app: {{ .Values.global.appName }}

 ports:

   - name: {{ .Values.global.appName }}-port

     port: {{ .Values.externalPort }}

     targetPort: {{ .Values.internalPort }}

     protocol: TCP

 type: NodePort
Admin-API ingress(Helm chart)
apiVersion: networking.k8s.io/v1

kind: Ingress

metadata:

 namespace: default

 name: ingress

 annotations:

   alb.ingress.kubernetes.io/load-balancer-name: {{ .Values.ingress.loadBalancerName }}

   alb.ingress.kubernetes.io/ip-address-type: ipv4

   alb.ingress.kubernetes.io/tags: {{ .Values.ingress.tags }}

   alb.ingress.kubernetes.io/scheme: internet-facing

   alb.ingress.kubernetes.io/certificate-arn: {{ .Values.ingress.certificateArn }}

   alb.ingress.kubernetes.io/listen-ports: '[{"HTTP": 80}, {"HTTPS":443}]'

   alb.ingress.kubernetes.io/healthcheck-protocol: HTTPS

   alb.ingress.kubernetes.io/healthcheck-path: {{ .Values.ingress.healthcheckPath }}

   alb.ingress.kubernetes.io/healthcheck-interval-seconds: {{ .Values.ingress.healthcheckIntervalSeconds }}

   alb.ingress.kubernetes.io/ssl-redirect: '443'

   alb.ingress.kubernetes.io/group.name: {{ .Values.ingress.loadBalancerGroup }}

spec:

 ingressClassName: alb

 rules:

   - host: {{ .Values.adminApi.domain }}

     http:

       paths:

         - path: {{ .Values.adminApi.path }}

           pathType: ImplementationSpecific

           backend:

             service:

               name: {{ .Values.adminApi.appName }}

               port:

                 number: {{ .Values.adminApi.externalPort }}
Admin-API autoscaling configuration (Helm chart)
{{- if .Values.autoscaling.enabled }}

apiVersion: autoscaling/v2beta1

kind: HorizontalPodAutoscaler

metadata:

 name: {{ include "ks.fullname" . }}

 labels:

   {{- include "ks.labels" . | nindent 4 }}

spec:

 scaleTargetRef:

   apiVersion: apps/v1

   kind: Deployment

   name: {{ include "ks.fullname" . }}

 minReplicas: {{ .Values.autoscaling.minReplicas }}

 maxReplicas: {{ .Values.autoscaling.maxReplicas }}

 metrics:

 {{- if .Values.autoscaling.targetCPUUtilizationPercentage }}

   - type: Resource

     resource:

       name: cpu

       targetAverageUtilization: {{ .Values.autoscaling.targetCPUUtilizationPercentage }}

 {{- end }}

 {{- if .Values.autoscaling.targetMemoryUtilizationPercentage }}

   - type: Resource

     resource:

       name: memory

       targetAverageUtilization: {{ .Values.autoscaling.targetMemoryUtilizationPercentage }}

 {{- end }}

{{- end }}
Values for templates are located in “values.yml”, “values-dev.yml”, and “values-stage.yml” files. Which of them will be used depends on the environment. Let’s check examples of some values for dev env.
Admin-API Helm values-stage.yml file
env: stage

appName: admin-api

domain: admin-api.xxxx.com

path: /*

internalPort: '80'

externalPort: '80'


replicas: 1

image:

 repository: xxxxxxxxx.dkr.ecr.us-east-2.amazonaws.com/admin-api

 pullPolicy: Always

 tag: latest


ingress:

 loadBalancerName: project-microservices-alb

 tags: Environment=stage,Kind=application

 certificateArn: arn:aws:acm:us-east-2:xxxxxxxxx:certificate/xxxxxx

 healthcheckPath: /healthcheck

 healthcheckIntervalSeconds: '15'

 loadBalancerGroup: project-microservices


autoscaling:

 enabled: false

 minReplicas: 1

 maxReplicas: 100

 targetCPUUtilizationPercentage: 80


env:

 - name: NODE_ENV

   value: stage


 - name: ADMIN_PORT

   value: "80"
To apply the configuration on the cluster, we need to upgrade the chart and restart our deployment.
Let’s check the GitHub Actions steps that are responsible for this.
Apply Helm configuration in GitHub Actions
     - name: Admin image build and push

       run: |

         docker build -t project-admin-api -f Dockerfile.admin .

         docker tag project-admin-api ${{ env.AWS_ECR_REGISTRY }}/project/${{ env.ENV }}/admin-api:latest

         docker push ${{ env.AWS_ECR_REGISTRY }}/project/${{ env.ENV }}/admin-api:latest


     - name: Helm upgrade admin-api

       uses: koslib/helm-eks-action@master

       env:

         KUBE_CONFIG_DATA: ${{ env.KUBE_CONFIG_DATA }}

       with:

         command: helm upgrade --install admin-api -n project-${{ env.ENV }} charts/admin-api/ -f charts/admin-api/values-${{ env.ENV }}.yaml


     - name: Deploy admin-api image

       uses: kodermax/kubectl-aws-eks@master

       env:

         KUBE_CONFIG_DATA: ${{ env.KUBE_CONFIG_DATA }}

       with:

         args: rollout restart deployment/admin-api-project-admin-api --namespace=project-${{ env.ENV }}
Summary
In this article, we checked out the development process of how to build microservices infrastructure and deploy them to the Kubernetes cluster. We tried to make it easy to understand, showing simple examples and avoiding additional complexity with full configurations. Obviously, there should be also implemented logging and monitoring configurations, but it deserves to be overviewed in the next article. Our Kubernetes cases do not limit to one case, so learn what we can do with it for your application.
Share this post
Tags
What’s your impression after reading this?
Love it!
Valuable
Exciting
Unsatisfied
YOU MAY ALSO LIKE


Let’s talk!


This site uses cookies to improve your user experience.Read our Privacy Policy
Accept